|
|
||
|---|---|---|
| .github | ||
| contrib | ||
| media | ||
| LICENSE | ||
| README.md | ||
| switch-to-backup-yubikey | ||
This is a guide to using YubiKey as a SmartCard for storing GPG encryption, signing and authentication keys, which can also be used for SSH. Many of the principles in this document are applicable to other smart card devices.
Keys stored on YubiKey are non-exportable (as opposed to file-based keys that are stored on disk) and are convenient for everyday use. Instead of having to remember and enter passphrases to unlock SSH/GPG keys, YubiKey needs only a physical touch after being unlocked with a PIN. All signing and encryption operations happen on the card, rather than in OS memory.
New! drduh/Purse is a password manager which uses GPG and YubiKey.
Security Note: If you followed this guide before Jan 2021, your GPG PIN and Admin PIN may be set to their default values (
123456and12345678respectively). This would allow an attacker to use your Yubikey or reset your PIN. Please see the Change PIN section for details on how to change your PINs.
If you have a comment or suggestion, please open an Issue on GitHub.
- Purchase
- Prepare environment
- Required software
- Entropy
- Creating keys
- Master key
- Sign with existing key
- Sub-keys
- Create keys with --batch and --quick-add-key
- Verify
- Export secret keys
- Revocation certificate
- Backup
- Export public keys
- Configure Smartcard
- Transfer keys
- Verify card
- Multiple YubiKeys
- Cleanup
- Using keys
- Rotating keys
- Adding notations
- SSH
- Remote Machines (GPG Agent Forwarding)
- Using Multiple Keys
- Require touch
- Reset
- Recovery after reset
- Notes
- Troubleshooting
- Alternatives
- Links
Purchase
All YubiKeys except the blue "security key" model are compatible with this guide. NEO models are limited to 2048-bit RSA keys. Compare YubiKeys here. In May 2021, Yubico also released a press release and blog post about supporting resident ssh keys on their Yubikeys including blue "security key 5 NFC" with OpenSSH 8.2 or later, see here for details.
To verify a YubiKey is genuine, open a browser with U2F support to https://www.yubico.com/genuine/. Insert a Yubico device, and select Verify Device to begin the process. Touch the YubiKey when prompted, and if asked, allow it to see the make and model of the device. If you see Verification complete, the device is authentic.
This website verifies YubiKey device attestation certificates signed by a set of Yubico certificate authorities, and helps mitigate supply chain attacks.
You will also need several small storage devices (microSD cards work well) for storing encrypted backups of your keys.
Prepare environment
To create cryptographic keys, a secure environment that can be reasonably assured to be free of adversarial control is recommended. Here is a general ranking of environments most to least likely to be compromised:
-
Daily-use operating system
-
Virtual machine on daily-use host OS (using virt-manager, VirtualBox, or VMware)
-
Separate hardened Debian or OpenBSD installation which can be dual booted
-
Live image, such as Debian Live or Tails
-
Secure hardware/firmware (Coreboot, Intel ME removed)
-
Dedicated air-gapped system with no networking capabilities
This guide recommends using a bootable "live" Debian Linux image to provide such an environment, however, depending on your threat model, you may want to take fewer or more steps to secure it.
To use Debian Live, download the latest image:
$ curl -LfO https://cdimage.debian.org/debian-cd/current-live/amd64/iso-hybrid/SHA512SUMS

$ curl -LfO https://cdimage.debian.org/debian-cd/current-live/amd64/iso-hybrid/SHA512SUMS.sign

$ curl -LfO https://cdimage.debian.org/debian-cd/current-live/amd64/iso-hybrid/$(awk '/xfce.iso/ {print $2}' SHA512SUMS)
Verify the signature of the hashes file with GPG:
$ gpg --verify SHA512SUMS.sign SHA512SUMS
gpg: Signature made Sat 09 May 2020 05:17:57 PM PDT
gpg:                using RSA key DF9B9C49EAA9298432589D76DA87E80D6294BE9B
gpg: Can't check signature: No public key

$ gpg --keyserver hkps://keyring.debian.org --recv DF9B9C49EAA9298432589D76DA87E80D6294BE9B
gpg: key 0xDA87E80D6294BE9B: public key "Debian CD signing key <debian-cd@lists.debian.org>" imported
gpg: Total number processed: 1
gpg:               imported: 1

$ gpg --verify SHA512SUMS.sign SHA512SUMS
gpg: Signature made Sat 09 May 2020 05:17:57 PM PDT
gpg:                using RSA key DF9B9C49EAA9298432589D76DA87E80D6294BE9B
gpg: Good signature from "Debian CD signing key <debian-cd@lists.debian.org>" [unknown]
gpg: WARNING: This key is not certified with a trusted signature!
gpg:          There is no indication that the signature belongs to the owner.
Primary key fingerprint: DF9B 9C49 EAA9 2984 3258  9D76 DA87 E80D 6294 BE9B
If the public key cannot be received, try changing the DNS resolver and/or use a different keyserver:
$ gpg --keyserver hkps://keyserver.ubuntu.com:443 --recv DF9B9C49EAA9298432589D76DA87E80D6294BE9B
Ensure the SHA512 hash of the live image matches the one in the signed file.
$ grep $(sha512sum debian-live-*-amd64-xfce.iso) SHA512SUMS
SHA512SUMS:799ec1fdb098caa7b60b71ed1fdb1f6390a1c6717b4314265e7042fa271c84f67fff0d0380297f60c4bcd0c1001e08623ab3d2a2ad64079d83d1795c40eb7a0a  debian-live-10.5.0-amd64-xfce.iso
See Verifying authenticity of Debian CDs for more information.
Mount a storage device and copy the image to it:
Linux
$ sudo dmesg | tail
usb-storage 3-2:1.0: USB Mass Storage device detected
scsi host2: usb-storage 3-2:1.0
scsi 2:0:0:0: Direct-Access     TS-RDF5  SD  Transcend    TS3A PQ: 0 ANSI: 6
sd 2:0:0:0: Attached scsi generic sg1 type 0
sd 2:0:0:0: [sdb] 31116288 512-byte logical blocks: (15.9 GB/14.8 GiB)
sd 2:0:0:0: [sdb] Write Protect is off
sd 2:0:0:0: [sdb] Mode Sense: 23 00 00 00
sd 2:0:0:0: [sdb] Write cache: disabled, read cache: enabled, doesn't support DPO or FUA
sdb: sdb1 sdb2
sd 2:0:0:0: [sdb] Attached SCSI removable disk

$ sudo dd if=debian-live-10.4.0-amd64-xfce.iso of=/dev/sdb bs=4M; sync
465+1 records in
465+1 records out
1951432704 bytes (2.0 GB, 1.8 GiB) copied, 42.8543 s, 45.5 MB/s
OpenBSD
$ dmesg | tail -n2
sd2 at scsibus4 targ 1 lun 0: <TS-RDF5, SD Transcend, TS3A> SCSI4 0/direct removable serial.0000000000000
sd2: 15193MB, 512 bytes/sector, 31116288 sectors

$ doas dd if=debian-live-10.4.0-amd64-xfce.iso of=/dev/rsd2c bs=4m
465+1 records in
465+1 records out
1951432704 bytes transferred in 139.125 secs (14026448 bytes/sec)
Shut down the computer and disconnect internal hard drives and all unnecessary peripheral devices. If being run within a VM, this part can be skipped as no such devices should be attached to the VM since the image will still be run as a "live image".
Required software
Boot the live image and configure networking.
Note If the screen locks, unlock with user/live.
Open the terminal and install required software packages.
Debian and Ubuntu
Note Live Ubuntu images may require modification to /etc/apt/sources.list
$ sudo apt update

$ sudo apt -y upgrade

$ sudo apt -y install wget gnupg2 gnupg-agent dirmngr cryptsetup scdaemon pcscd secure-delete hopenpgp-tools yubikey-personalization
You may additionally need (particularly for Ubuntu 18.04 and 20.04):
$ sudo apt -y install libssl-dev swig libpcsclite-dev
To download a copy of this guide:
$ wget https://raw.githubusercontent.com/drduh/YubiKey-Guide/master/README.md
To install and use the ykman utility:
$ sudo apt -y install python3-pip python3-pyscard

$ pip3 install PyOpenSSL

$ pip3 install yubikey-manager


$ sudo service pcscd start

$ ~/.local/bin/ykman openpgp info
Fedora
$ sudo dnf install wget
$ wget https://github.com/rpmsphere/noarch/raw/master/r/rpmsphere-release-34-2.noarch.rpm
$ sudo rpm -Uvh rpmsphere-release*rpm

$ sudo dnf install gnupg2 dirmngr cryptsetup gnupg2-smime pcsc-tools opensc pcsc-lite secure-delete pgp-tools yubikey-personalization-gui
Arch
$ sudo pacman -Syu gnupg pcsclite ccid hopenpgp-tools yubikey-personalization
RHEL7
$ sudo yum install -y gnupg2 pinentry-curses pcsc-lite pcsc-lite-libs gnupg2-smime
NixOS
Generate a NixOS LiveCD image with the given config:
# yubikey-installer.nix
{ nixpkgs ? <nixpkgs>, system ? "x86_64-linux" } :

let
  config = { pkgs, ... }:
  with pkgs; {
    imports = [ <nixpkgs/nixos/modules/installer/cd-dvd/installation-cd-graphical-plasma5.nix> ];

    boot.kernelPackages = linuxPackages_latest;

    services.pcscd.enable = true;
    services.udev.packages = [ yubikey-personalization ];

    environment.systemPackages = [ gnupg pinentry-curses pinentry-qt paperkey wget ];

    programs = {
      ssh.startAgent = false;
      gnupg.agent = {
        enable = true;
        enableSSHSupport = true;
      };
    };
  };

  evalNixos = configuration: import <nixpkgs/nixos> {
    inherit system configuration;
  };

in {
  iso = (evalNixos config).config.system.build.isoImage;
}
Build the installer and copy it to a USB drive.
$ nix build -f yubikey-installer.nix --out-link installer

$ sudo cp -v installer/iso/*.iso /dev/sdb; sync
'installer/iso/nixos-20.03.git.c438ce1-x86_64-linux.iso' -> '/dev/sdb'
On NixOS, ensure that you have pinentry-program /run/current-system/sw/bin/pinentry-curses in your $GNUPGHOME/gpg-agent.conf before running any gpg commands.
OpenBSD
$ doas pkg_add gnupg pcsc-tools
macOS
Download and install Homebrew and the following packages:
$ brew install gnupg yubikey-personalization hopenpgp-tools ykman pinentry-mac wget
Note An additional Python package dependency may need to be installed to use ykman - pip install yubikey-manager
Windows
Download and install Gpg4Win and PuTTY.
You may also need more recent versions of yubikey-personalization and yubico-c.
Entropy
Generating cryptographic keys requires high-quality randomness, measured as entropy.
To check the available entropy available on Linux:
$ cat /proc/sys/kernel/random/entropy_avail
849
Most operating systems use software-based pseudorandom number generators. On newer machines there are CPU based hardware random number generators (HRNG) or you can use a separate hardware device like the White Noise or OneRNG will increase the speed of entropy generation and possibly the quality.
From YubiKey firmware version 5.2.3 onwards - which introduces "Enhancements to OpenPGP 3.4 Support" - we can gather additional entropy from the YubiKey itself via the SmartCard interface.
YubiKey
To feed the system's PRNG with entropy generated by the YubiKey itself, issue:
$ echo "SCD RANDOM 512" | gpg-connect-agent | sudo tee /dev/random | hexdump -C
This will seed the Linux kernel's PRNG with additional 512 bytes retrieved from the YubiKey.
OneRNG
Install rng-tools software:
$ sudo apt -y install at rng-tools python3-gnupg openssl
If you have a hardware device other than the CPU based one, install the accompany software and point rng-tools to its /dev/ device.
OneRNG specific example:
$ wget https://github.com/OneRNG/onerng.github.io/raw/master/sw/onerng_3.7-1_all.deb

$ sha256sum onerng_3.7-1_all.deb
b7cda2fe07dce219a95dfeabeb5ee0f662f64ba1474f6b9dddacc3e8734d8f57  onerng_3.7-1_all.deb

$ sudo dpkg -i onerng_3.7-1_all.deb

$ echo "HRNGDEVICE=/dev/ttyACM0" | sudo tee /etc/default/rng-tools
Plug in the device and restart rng-tools:
$ sudo atd

$ sudo service rng-tools restart
Test by emptying /dev/random - the light on the device will dim briefly:
$ cat /dev/random >/dev/null
[Press Control-C]
After a few seconds, verify the available entropy pool is quickly re-seeded:
$ cat /proc/sys/kernel/random/entropy_avail
3049
An entropy pool value greater than 2000 is sufficient.
Creating keys
Temporary working directory
Create a temporary directory which will be cleared on reboot and set it as the GnuPG directory:
$ export GNUPGHOME=$(mktemp -d -t gnupg_$(date +%Y%m%d%H%M)_XXX)
Otherwise, to preserve the working environment, set the GnuPG directory to your home folder:
$ export GNUPGHOME=~/gnupg-workspace
Harden configuration
Create a hardened configuration in the temporary working directory with the following options:
$ wget -O $GNUPGHOME/gpg.conf https://raw.githubusercontent.com/drduh/config/master/gpg.conf

$ grep -ve "^#" $GNUPGHOME/gpg.conf
personal-cipher-preferences AES256 AES192 AES
personal-digest-preferences SHA512 SHA384 SHA256
personal-compress-preferences ZLIB BZIP2 ZIP Uncompressed
default-preference-list SHA512 SHA384 SHA256 AES256 AES192 AES ZLIB BZIP2 ZIP Uncompressed
cert-digest-algo SHA512
s2k-digest-algo SHA512
s2k-cipher-algo AES256
charset utf-8
fixed-list-mode
no-comments
no-emit-version
keyid-format 0xlong
list-options show-uid-validity
verify-options show-uid-validity
with-fingerprint
require-cross-certification
no-symkey-cache
use-agent
throw-keyids
Disable networking for the remainder of the setup.
Master key
The first key to generate is the master key. It will be used for certification only: to issue sub-keys that are used for encryption, signing and authentication.
Important The master key should be kept offline at all times and only accessed to revoke or issue new sub-keys. Keys can also be generated on the YubiKey itself to ensure no other copies exist.
You'll be prompted to enter and verify a passphrase - keep it handy as you'll need it multiple times later.
Generate a strong passphrase which could be written down in a secure place or memorized:
$ gpg --gen-random --armor 0 24
ydOmByxmDe63u7gqx2XI9eDgpvJwibNH
Use upper case letters for improved readability if they are written down:
$ LC_ALL=C tr -dc '[:upper:]' < /dev/urandom | fold -w 20 | head -n1
BSSYMUGGTJQVWZZWOPJG
Important Save this credential in a permanent, secure place as it will be needed to issue new sub-keys after expiration, and to provision additional YubiKeys.
Tip On Linux or OpenBSD, select the password using the mouse or by double-clicking on it to copy to clipboard. Paste using the middle mouse button or Shift-Insert.
Generate a new key with GPG, selecting (8) RSA (set your own capabilities), Certify capability only and 4096 bit key size.
Do not set the master key to expire - see Note #3.
$ gpg --expert --full-generate-key

Please select what kind of key you want:
   (1) RSA and RSA (default)
   (2) DSA and Elgamal
   (3) DSA (sign only)
   (4) RSA (sign only)
   (7) DSA (set your own capabilities)
   (8) RSA (set your own capabilities)
   (9) ECC and ECC
  (10) ECC (sign only)
  (11) ECC (set your own capabilities)
  (13) Existing key
Your selection? 8

Possible actions for a RSA key: Sign Certify Encrypt Authenticate
Current allowed actions: Sign Certify Encrypt

   (S) Toggle the sign capability
   (E) Toggle the encrypt capability
   (A) Toggle the authenticate capability
   (Q) Finished

Your selection? E

Possible actions for a RSA key: Sign Certify Encrypt Authenticate
Current allowed actions: Sign Certify

   (S) Toggle the sign capability
   (E) Toggle the encrypt capability
   (A) Toggle the authenticate capability
   (Q) Finished

Your selection? S

Possible actions for a RSA key: Sign Certify Encrypt Authenticate
Current allowed actions: Certify

   (S) Toggle the sign capability
   (E) Toggle the encrypt capability
   (A) Toggle the authenticate capability
   (Q) Finished

Your selection? Q
RSA keys may be between 1024 and 4096 bits long.
What keysize do you want? (2048) 4096
Requested keysize is 4096 bits
Please specify how long the key should be valid.
         0 = key does not expire
      <n>  = key expires in n days
      <n>w = key expires in n weeks
      <n>m = key expires in n months
      <n>y = key expires in n years
Key is valid for? (0) 0
Key does not expire at all
Is this correct? (y/N) y
Input any name and email address:
GnuPG needs to construct a user ID to identify your key.

Real name: Dr Duh
Email address: doc@duh.to
Comment: [Optional - leave blank]
You selected this USER-ID:
    "Dr Duh <doc@duh.to>"

Change (N)ame, (C)omment, (E)mail or (O)kay/(Q)uit? o

We need to generate a lot of random bytes. It is a good idea to perform
some other action (type on the keyboard, move the mouse, utilize the
disks) during the prime generation; this gives the random number
generator a better chance to gain enough entropy.

gpg: /tmp.FLZC0xcM/trustdb.gpg: trustdb created
gpg: key 0xFF3E7D88647EBCDB marked as ultimately trusted
gpg: directory '/tmp.FLZC0xcM/openpgp-revocs.d' created
gpg: revocation certificate stored as '/tmp.FLZC0xcM/openpgp-revocs.d/011CE16BD45B27A55BA8776DFF3E7D88647EBCDB.rev'
public and secret key created and signed.

pub   rsa4096/0xFF3E7D88647EBCDB 2017-10-09 [C]
      Key fingerprint = 011C E16B D45B 27A5 5BA8  776D FF3E 7D88 647E BCDB
uid                              Dr Duh <doc@duh.to>
Export the key ID as a variable (KEYID) for use later:
$ export KEYID=0xFF3E7D88647EBCDB
Sign with existing key
(Optional) If you already have a PGP key, you may want to sign the new key with the old one to prove that the new key is controlled by you.
Export your existing key to move it to the working keyring:
$ gpg --export-secret-keys --armor --output /tmp/new.sec
Then sign the new key:
$ gpg --default-key $OLDKEY --sign-key $KEYID
Sub-keys
Edit the master key to add sub-keys:
$ gpg --expert --edit-key $KEYID

Secret key is available.

sec  rsa4096/0xEA5DE91459B80592
    created: 2017-10-09  expires: never       usage: C
    trust: ultimate      validity: ultimate
[ultimate] (1). Dr Duh <doc@duh.to>
Use 4096-bit RSA keys.
Use a 1 year expiration for sub-keys - they can be renewed using the offline master key. See rotating keys.
Signing
Create a signing key by selecting addkey then (4) RSA (sign only):
gpg> addkey
Key is protected.

You need a passphrase to unlock the secret key for
user: "Dr Duh <doc@duh.to>"
4096-bit RSA key, ID 0xFF3E7D88647EBCDB, created 2016-05-24

Please select what kind of key you want:
   (3) DSA (sign only)
   (4) RSA (sign only)
   (5) Elgamal (encrypt only)
   (6) RSA (encrypt only)
   (7) DSA (set your own capabilities)
   (8) RSA (set your own capabilities)
Your selection? 4
RSA keys may be between 1024 and 4096 bits long.
What keysize do you want? (2048) 4096
Requested keysize is 4096 bits
Please specify how long the key should be valid.
         0 = key does not expire
      <n>  = key expires in n days
      <n>w = key expires in n weeks
      <n>m = key expires in n months
      <n>y = key expires in n years
Key is valid for? (0) 1y
Key expires at Mon 10 Sep 2018 00:00:00 PM UTC
Is this correct? (y/N) y
Really create? (y/N) y
We need to generate a lot of random bytes. It is a good idea to perform
some other action (type on the keyboard, move the mouse, utilize the
disks) during the prime generation; this gives the random number
generator a better chance to gain enough entropy.

sec  rsa4096/0xFF3E7D88647EBCDB
    created: 2017-10-09  expires: never       usage: C
    trust: ultimate      validity: ultimate
ssb  rsa4096/0xBECFA3C1AE191D15
    created: 2017-10-09  expires: 2018-10-09       usage: S
[ultimate] (1). Dr Duh <doc@duh.to>
Encryption
Next, create an encryption key by selecting (6) RSA (encrypt only):
gpg> addkey
Please select what kind of key you want:
   (3) DSA (sign only)
   (4) RSA (sign only)
   (5) Elgamal (encrypt only)
   (6) RSA (encrypt only)
   (7) DSA (set your own capabilities)
   (8) RSA (set your own capabilities)
  (10) ECC (sign only)
  (11) ECC (set your own capabilities)
  (12) ECC (encrypt only)
  (13) Existing key
Your selection? 6
RSA keys may be between 1024 and 4096 bits long.
What keysize do you want? (2048) 4096
Requested keysize is 4096 bits
Please specify how long the key should be valid.
         0 = key does not expire
      <n>  = key expires in n days
      <n>w = key expires in n weeks
      <n>m = key expires in n months
      <n>y = key expires in n years
Key is valid for? (0) 1y
Key expires at Mon 10 Sep 2018 00:00:00 PM UTC
Is this correct? (y/N) y
Really create? (y/N) y
We need to generate a lot of random bytes. It is a good idea to perform
some other action (type on the keyboard, move the mouse, utilize the
disks) during the prime generation; this gives the random number
generator a better chance to gain enough entropy.

sec  rsa4096/0xFF3E7D88647EBCDB
    created: 2017-10-09  expires: never       usage: C
    trust: ultimate      validity: ultimate
ssb  rsa4096/0xBECFA3C1AE191D15
    created: 2017-10-09  expires: 2018-10-09       usage: S
ssb  rsa4096/0x5912A795E90DD2CF
    created: 2017-10-09  expires: 2018-10-09       usage: E
[ultimate] (1). Dr Duh <doc@duh.to>
Authentication
Finally, create an authentication key.
GPG doesn't provide an authenticate-only key type, so select (8) RSA (set your own capabilities) and toggle the required capabilities until the only allowed action is Authenticate:
gpg> addkey
Please select what kind of key you want:
   (3) DSA (sign only)
   (4) RSA (sign only)
   (5) Elgamal (encrypt only)
   (6) RSA (encrypt only)
   (7) DSA (set your own capabilities)
   (8) RSA (set your own capabilities)
  (10) ECC (sign only)
  (11) ECC (set your own capabilities)
  (12) ECC (encrypt only)
  (13) Existing key
Your selection? 8

Possible actions for a RSA key: Sign Encrypt Authenticate
Current allowed actions: Sign Encrypt

   (S) Toggle the sign capability
   (E) Toggle the encrypt capability
   (A) Toggle the authenticate capability
   (Q) Finished

Your selection? S

Possible actions for a RSA key: Sign Encrypt Authenticate
Current allowed actions: Encrypt

   (S) Toggle the sign capability
   (E) Toggle the encrypt capability
   (A) Toggle the authenticate capability
   (Q) Finished

Your selection? E

Possible actions for a RSA key: Sign Encrypt Authenticate
Current allowed actions:

   (S) Toggle the sign capability
   (E) Toggle the encrypt capability
   (A) Toggle the authenticate capability
   (Q) Finished

Your selection? A

Possible actions for a RSA key: Sign Encrypt Authenticate
Current allowed actions: Authenticate

   (S) Toggle the sign capability
   (E) Toggle the encrypt capability
   (A) Toggle the authenticate capability
   (Q) Finished

Your selection? Q
RSA keys may be between 1024 and 4096 bits long.
What keysize do you want? (2048) 4096
Requested keysize is 4096 bits
Please specify how long the key should be valid.
         0 = key does not expire
      <n>  = key expires in n days
      <n>w = key expires in n weeks
      <n>m = key expires in n months
      <n>y = key expires in n years
Key is valid for? (0) 1y
Key expires at Mon 10 Sep 2018 00:00:00 PM UTC
Is this correct? (y/N) y
Really create? (y/N) y
We need to generate a lot of random bytes. It is a good idea to perform
some other action (type on the keyboard, move the mouse, utilize the
disks) during the prime generation; this gives the random number
generator a better chance to gain enough entropy.

sec  rsa4096/0xFF3E7D88647EBCDB
    created: 2017-10-09  expires: never       usage: C
    trust: ultimate      validity: ultimate
ssb  rsa4096/0xBECFA3C1AE191D15
    created: 2017-10-09  expires: 2018-10-09       usage: S
ssb  rsa4096/0x5912A795E90DD2CF
    created: 2017-10-09  expires: 2018-10-09       usage: E
ssb  rsa4096/0x3F29127E79649A3D
    created: 2017-10-09  expires: 2018-10-09       usage: A
[ultimate] (1). Dr Duh <doc@duh.to>
Finish by saving the keys.
gpg> save
Add extra identities
(Optional) To add additional email addresses or identities, use adduid.
First open the keyring:
$ gpg --expert --edit-key $KEYID
Then add the new identity:
gpg> adduid
Real name: Dr Duh
Email address: DrDuh@other.org
Comment:
You selected this USER-ID:
    "Dr Duh <DrDuh@other.org>"

sec  rsa4096/0xFF3E7D88647EBCDB
    created: 2017-10-09  expires: never       usage: C
    trust: ultimate      validity: ultimate
ssb  rsa4096/0xBECFA3C1AE191D15
    created: 2017-10-09  expires: never       usage: S
ssb  rsa4096/0x5912A795E90DD2CF
    created: 2017-10-09  expires: never       usage: E
ssb  rsa4096/0x3F29127E79649A3D
    created: 2017-10-09  expires: never       usage: A
[ultimate] (1). Dr Duh <doc@duh.to>
[ unknown] (2). Dr Duh <DrDuh@other.org>

gpg> trust
sec  rsa4096/0xFF3E7D88647EBCDB
    created: 2017-10-09  expires: never       usage: C
    trust: ultimate      validity: ultimate
ssb  rsa4096/0xBECFA3C1AE191D15
    created: 2017-10-09  expires: never       usage: S
ssb  rsa4096/0x5912A795E90DD2CF
    created: 2017-10-09  expires: never       usage: E
ssb  rsa4096/0x3F29127E79649A3D
    created: 2017-10-09  expires: never       usage: A
[ultimate] (1). Dr Duh <doc@duh.to>
[ unknown] (2). Dr Duh <DrDuh@other.org>

Please decide how far you trust this user to correctly verify other users' keys
(by looking at passports, checking fingerprints from different sources, etc.)

  1 = I don't know or won't say
  2 = I do NOT trust
  3 = I trust marginally
  4 = I trust fully
  5 = I trust ultimately
  m = back to the main menu

Your decision? 5
Do you really want to set this key to ultimate trust? (y/N) y

sec  rsa4096/0xFF3E7D88647EBCDB
    created: 2017-10-09  expires: never       usage: C
    trust: ultimate      validity: ultimate
ssb  rsa4096/0xBECFA3C1AE191D15
    created: 2017-10-09  expires: never       usage: S
ssb  rsa4096/0x5912A795E90DD2CF
    created: 2017-10-09  expires: never       usage: E
ssb  rsa4096/0x3F29127E79649A3D
    created: 2017-10-09  expires: never       usage: A
[ultimate] (1). Dr Duh <doc@duh.to>
[ unknown] (2). Dr Duh <DrDuh@other.org>

gpg> uid 1

sec  rsa4096/0xFF3E7D88647EBCDB
created: 2017-10-09  expires: never       usage: C
    trust: ultimate      validity: ultimate
ssb  rsa4096/0xBECFA3C1AE191D15
    created: 2017-10-09  expires: never       usage: S
ssb  rsa4096/0x5912A795E90DD2CF
    created: 2017-10-09  expires: never       usage: E
ssb  rsa4096/0x3F29127E79649A3D
    created: 2017-10-09  expires: never       usage: A
[ultimate] (1)* Dr Duh <doc@duh.to>
[ unknown] (2). Dr Duh <DrDuh@other.org>

gpg> primary

sec  rsa4096/0xFF3E7D88647EBCDB
created: 2017-10-09  expires: never       usage: C
    trust: ultimate      validity: ultimate
ssb  rsa4096/0xBECFA3C1AE191D15
    created: 2017-10-09  expires: never       usage: S
ssb  rsa4096/0x5912A795E90DD2CF
    created: 2017-10-09  expires: never       usage: E
ssb  rsa4096/0x3F29127E79649A3D
    created: 2017-10-09  expires: never       usage: A
[ultimate] (1)* Dr Duh <doc@duh.to>
[ unknown] (2)  Dr Duh <DrDuh@other.org>

gpg> save
By default, the last identity added will be the primary user ID - use primary to change that.
Create keys with --batch and --quick-add-keys
To remove some complexity from the process, we will show an alternate procedure to generate the keys using template files and the --batch parameter. For futher details, full GNUPG documentation can be found at this link. This procedure will have just the same result as described above.
For your convenience you can start from this RSA4096 key template: gen-params-rsa4096. If you're using GnuPG v2.1.7 or newer we strongly recommend generating ED25519 keys (gen-params-ed25519, the procedure is the same). These templates will not set the master key to expire - see Note #3.
Generate a RSA4096 master key:
$ gpg --batch --generate-key gen-params-rsa4096
gpg: Generating a basic OpenPGP key
gpg: key 0xEA5DE91459B80592 marked as ultimately trusted
gpg: revocation certificate stored as '/tmp.FLZC0xcM/openpgp-revocs.d/D6F924841F78D62C65ABB9588B461860159FFB7B.rev'
gpg: done
Let's check the result:
$ gpg --list-key
gpg: checking the trustdb
gpg: marginals needed: 3  completes needed: 1  trust model: pgp
gpg: depth: 0  valid:   1  signed:   0  trust: 0-, 0q, 0n, 0m, 0f, 1u
/tmp.FLZC0xcM/pubring.kbx
-------------------------------
pub   rsa4096/0xFF3E7D88647EBCDB 2021-08-22 [C]
       Key fingerprint = 011C E16B D45B 27A5 5BA8  776D FF3E 7D88 647E BCDB
uid                   [ultimate] Dr Duh <doc@duh.to>
The key fingerprint (011C E16B D45B 27A5 5BA8 776D FF3E 7D88 647E BCDB) will be used to create the three subkeys for signing, authentication and encryption.
Now create the three subkeys for signing, authentication and encryption. Use a 1 year expiration for sub-keys - they can be renewed using the offline master key, see rotating keys.
We will use the the quick key manipulation interface of GNUPG (with --quick-add-key), see the documentation.
Create a signing subkey:
$ gpg --quick-add-key "011C E16B D45B 27A5 5BA8  776D FF3E 7D88 647E BCDB" \
  rsa4096 sign 1y
Now create an encryption subkey:
$ gpg --quick-add-key "011C E16B D45B 27A5 5BA8  776D FF3E 7D88 647E BCDB" \
  rsa4096 encrypt 1y
Finally, create an authentication subkey:
$ gpg --quick-add-key "011C E16B D45B 27A5 5BA8  776D FF3E 7D88 647E BCDB" \
  rsa4096 auth 1y
Let's check the final result:
$ gpg --list-keys
/tmp.FLZC0xcM/pubring.kbx
-------------------------------
pub   rsa4096/0xFF3E7D88647EBCDB 2021-08-22 [C]
      Key fingerprint = 011C E16B D45B 27A5 5BA8  776D FF3E 7D88 647E BCDB
uid                   [ultimate] Dr Duh <doc@duh.to>
sub   rsa4096/0xBECFA3C1AE191D15 2017-10-09 [S] [expires: 2018-10-09]
sub   rsa4096/0x5912A795E90DD2CF 2017-10-09 [E] [expires: 2018-10-09]
sub   rsa4096/0x3F29127E79649A3D 2017-10-09 [A] [expires: 2018-10-09]
Verify
List the generated secret keys and verify the output:
$ gpg -K
/tmp.FLZC0xcM/pubring.kbx
-------------------------------------------------------------------------
sec   rsa4096/0xFF3E7D88647EBCDB 2017-10-09 [C]
      Key fingerprint = 011C E16B D45B 27A5 5BA8  776D FF3E 7D88 647E BCDB
uid                            Dr Duh <doc@duh.to>
ssb   rsa4096/0xBECFA3C1AE191D15 2017-10-09 [S] [expires: 2018-10-09]
ssb   rsa4096/0x5912A795E90DD2CF 2017-10-09 [E] [expires: 2018-10-09]
ssb   rsa4096/0x3F29127E79649A3D 2017-10-09 [A] [expires: 2018-10-09]
Add any additional identities or email addresses you wish to associate using the adduid command.
Tip Verify with a OpenPGP key best practice checker:
$ gpg --export $KEYID | hokey lint
The output will display any problems with your key in red text. If everything is green, your key passes each of the tests. If it is red, your key has failed one of the tests.
hokey may warn (orange text) about cross certification for the authentication key. GPG's Signing Subkey Cross-Certification documentation has more detail on cross certification, and gpg v2.2.1 notes "subkey does not sign and so does not need to be cross-certified". hokey may also indicate a problem (red text) with
Key expiration times: []on the primary key (see Note #3 about not setting an expiry for the primary key).
Export secret keys
The master key and sub-keys will be encrypted with your passphrase when exported.
Save a copy of your keys:
$ gpg --armor --export-secret-keys $KEYID > $GNUPGHOME/mastersub.key

$ gpg --armor --export-secret-subkeys $KEYID > $GNUPGHOME/sub.key
On Windows, note that using any extension other than .gpg or attempting IO redirection to a file will garble the secret key, making it impossible to import it again at a later date:
$ gpg -o \path\to\dir\mastersub.gpg --armor --export-secret-keys $KEYID

$ gpg -o \path\to\dir\sub.gpg --armor --export-secret-subkeys $KEYID
Revocation certificate
Although we will backup and store the master key in a safe place, it is best practice to never rule out the possibility of losing it or having the backup fail. Without the master key, it will be impossible to renew or rotate subkeys or generate a revocation certificate, the PGP identity will be useless.
Even worse, we cannot advertise this fact in any way to those that are using our keys. It is reasonable to assume this will occur at some point and the only remaining way to deprecate orphaned keys is a revocation certificate.
To create the revocation certificate:
$ gpg --output $GNUPGHOME/revoke.asc --gen-revoke $KEYID
The revoke.asc certificate file should be stored (or printed) in a (secondary) place that allows retrieval in case the main backup fails.
Backup
Once keys are moved to YubiKey, they cannot be moved again! Create an encrypted backup of the keyring on removable media so you can keep it offline in a safe place.
Tip The ext2 filesystem (without encryption) can be mounted on both Linux and OpenBSD. Consider using a FAT32/NTFS filesystem for MacOS/Windows compatibility instead.
As an additional backup measure, consider using a paper copy of the keys. The Linux Kernel Maintainer PGP Guide points out that such printouts are still password-protected. It recommends to write the password on the paper, since it will be unlikely that you remember the original key password that was used when the paper backup was created. Obviously, you need a really good place to keep such a printout.
Linux
Attach another external storage device and check its label:
$ sudo dmesg | tail
mmc0: new high speed SDHC card at address a001
mmcblk0: mmc0:a001 SS16G 14.8 GiB

$ sudo fdisk -l /dev/mmcblk0
Disk /dev/mmcblk0: 14.9 GiB, 15931539456 bytes, 31116288 sectors
Units: sectors of 1 * 512 = 512 bytes
Sector size (logical/physical): 512 bytes / 512 bytes
I/O size (minimum/optimal): 512 bytes / 512 bytes
Write it with random data to prepare for encryption:
$ sudo dd if=/dev/urandom of=/dev/mmcblk0 bs=4M status=progress
Erase and create a new partition table:
$ sudo fdisk /dev/mmcblk0

Welcome to fdisk (util-linux 2.33.1).
Changes will remain in memory only, until you decide to write them.
Be careful before using the write command.

Device does not contain a recognized partition table.
Created a new DOS disklabel with disk identifier 0x3c1ad14a.

Command (m for help): g
Created a new GPT disklabel (GUID: 4E7495FD-85A3-3E48-97FC-2DD8D41516C3).

Command (m for help): w
The partition table has been altered.
Calling ioctl() to re-read partition table.
Syncing disks.
Create a new partition with a 25 Megabyte size:
$ sudo fdisk /dev/mmcblk0

Welcome to fdisk (util-linux 2.33.1).
Changes will remain in memory only, until you decide to write them.
Be careful before using the write command.

Command (m for help): n
Partition type
   p   primary (0 primary, 0 extended, 4 free)
   e   extended (container for logical partitions)
Select (default p): p
Partition number (1-4, default 1):
First sector (2048-31116287, default 2048):
Last sector, +/-sectors or +/-size{K,M,G,T,P} (2048-31116287, default 31116287): +25M

Created a new partition 1 of type 'Linux' and of size 25 MiB.

Command (m for help): w
The partition table has been altered.
Calling ioctl() to re-read partition table.
Syncing disks.
Use LUKS to encrypt the new partition:
$ sudo cryptsetup luksFormat /dev/mmcblk0p1

WARNING!
========
This will overwrite data on /dev/mmcblk0p1 irrevocably.

Are you sure? (Type uppercase yes): YES
Enter passphrase for /dev/mmcblk0p1:
Verify passphrase:
Mount the partition:
$ sudo cryptsetup luksOpen /dev/mmcblk0p1 secret
Enter passphrase for /dev/mmcblk0p1:
Create a filesystem:
$ sudo mkfs.ext2 /dev/mapper/secret -L gpg-$(date +%F)
Creating filesystem with 9216 1k blocks and 2304 inodes
Superblock backups stored on blocks:
        8193

Allocating group tables: done
Writing inode tables: done
Writing superblocks and filesystem accounting information: done
Mount the filesystem and copy the temporary directory with the keyring:
$ sudo mkdir /mnt/encrypted-storage

$ sudo mount /dev/mapper/secret /mnt/encrypted-storage

$ sudo cp -avi $GNUPGHOME /mnt/encrypted-storage/
Optional Backup the OneRNG package:
$ sudo cp onerng_3.6-1_all.deb /mnt/encrypted-storage/
Keep the backup mounted if you plan on setting up two or more keys as keytocard will delete the local copy on save.
Unmount, close and disconnect the encrypted volume:
$ sudo umount /mnt/encrypted-storage/

$ sudo cryptsetup luksClose secret
OpenBSD
Attach a USB disk and determine its label:
$ dmesg | grep sd.\ at
sd2 at scsibus5 targ 1 lun 0: <TS-RDF5, SD Transcend, TS37> SCSI4 0/direct removable serial.00000000000000000000
Print the existing partitions to make sure it's the right device:
$ doas disklabel -h sd2
Initialize the disk by creating an a partition with FS type RAID and size of 25 Megabytes:
$ doas fdisk -giy sd2
Writing MBR at offset 0.
Writing GPT.

$ doas disklabel -E sd2
Label editor (enter '?' for help at any prompt)
sd2> a a
offset: [64]
size: [31101776] 25M
FS type: [4.2BSD] RAID
sd2*> w
sd2> q
No label changes
Encrypt with bioctl:
$ doas bioctl -c C -l sd2a softraid0
New passphrase:
Re-type passphrase:
softraid0: CRYPTO volume attached as sd3
Create an i partition on the new crypto volume and the filesystem:
$ doas fdisk -giy sd3
Writing MBR at offset 0.
Writing GPT.

$ doas disklabel -E sd3
Label editor (enter '?' for help at any prompt)
sd3> a i
offset: [64]
size: [16001]
FS type: [4.2BSD]
sd3*> w
sd3> q
No label changes.

$ doas newfs sd3i
Mount the filesystem and copy the temporary directory with the keyring:
$ doas mkdir /mnt/encrypted-storage

$ doas mount /dev/sd3i /mnt/encrypted-storage

$ doas cp -avi $GNUPGHOME /mnt/encrypted-storage
Keep the backup mounted if you plan on setting up two or more keys as keytocard will delete the local copy on save.
Otherwise, unmount and disconnect the encrypted volume:
$ doas umount /mnt/encrypted-storage

$ doas bioctl -d sd3
See OpenBSD FAQ#14 for more information.
Export public keys
Important Without the public key, you will not be able to use GPG to encrypt, decrypt, nor sign messages. However, you will still be able to use YubiKey for SSH authentication.
Create another partition on the removable storage device to store the public key, or reconnect networking and upload to a key server.
Linux
$ sudo fdisk /dev/mmcblk0

Command (m for help): n
Partition type
   p   primary (1 primary, 0 extended, 3 free)
   e   extended (container for logical partitions)
Select (default p):
Partition number (2-4, default 2):
First sector (22528-31116287, default 22528):
Last sector, +sectors or +size{K,M,G,T,P} (22528-31116287, default 31116287): +25M

Created a new partition 2 of type 'Linux' and of size 25 MiB.

Command (m for help): w
The partition table has been altered.
Calling ioctl() to re-read partition table.
Syncing disks.

$ sudo mkfs.ext2 /dev/mmcblk0p2
Creating filesystem with 10240 1k blocks and 2560 inodes
Superblock backups stored on blocks:
        8193

Allocating group tables: done
Writing inode tables: done
Writing superblocks and filesystem accounting information: done

$ sudo mkdir /mnt/public

$ sudo mount /dev/mmcblk0p2 /mnt/public/

$ gpg --armor --export $KEYID | sudo tee /mnt/public/gpg-$KEYID-$(date +%F).asc
OpenBSD
$ doas disklabel -E sd2
Label editor (enter '?' for help at any prompt)
sd2> a b
offset: [32130]
size: [31069710] 25M
FS type: [swap] 4.2BSD
sd2*> w
sd2> q
No label changes.

$ doas newfs sd2b

$ doas mkdir /mnt/public

$ doas mount /dev/sd2b /mnt/public

$ gpg --armor --export $KEYID | doas tee /mnt/public/gpg-$KEYID-$(date +%F).asc
Windows
$ gpg -o \path\to\dir\pubkey.gpg --armor --export $KEYID
Keyserver
(Optional) Upload the public key to a public keyserver:
$ gpg --send-key $KEYID

$ gpg --keyserver pgp.mit.edu --send-key $KEYID

$ gpg --keyserver keys.gnupg.net --send-key $KEYID

$ gpg --keyserver hkps://keyserver.ubuntu.com:443 --send-key $KEYID
After some time, the public key will propagate to other servers.
Configure Smartcard
Plug in a YubiKey and use GPG to configure it as a smartcard:
$ gpg --card-edit
Reader ...........: Yubico Yubikey 4 OTP U2F CCID
Application ID ...: D2760001240102010006055532110000
Version ..........: 3.4
Manufacturer .....: Yubico
Serial number ....: 05553211
Name of cardholder: [not set]
Language prefs ...: [not set]
Sex ..............: unspecified
URL of public key : [not set]
Login data .......: [not set]
Signature PIN ....: not forced
Key attributes ...: rsa2048 rsa2048 rsa2048
Max. PIN lengths .: 127 127 127
PIN retry counter : 3 0 3
Signature counter : 0
KDF setting ......: off
Signature key ....: [none]
Encryption key....: [none]
Authentication key: [none]
General key info..: [none]
Note If the card is locked, see Reset.
Windows
Use the YubiKey Manager application (note, this is not the similarly named older YubiKey NEO Manager) to enable CCID functionality.
Enable KDF
Key Derived Function (KDF) enables YubiKey to store the hash of PIN, preventing the PIN from being passed as plain text. Note that this requires a relatively new version of GnuPG to work, and may not be compatible with other GPG clients (notably mobile clients). These incompatible clients will be unable to use the YubiKey GPG functions as the PIN will always be rejected. If you are not sure you will only be using your YubiKey on supported platforms, it may be better to skip this step.
gpg/card> admin
Admin commands are allowed

gpg/card> kdf-setup
Change PIN
The GPG interface is separate from other modules on a Yubikey such as the PIV interface. The GPG interface has its own PIN, Admin PIN, and Reset Code - these should be changed from default values!
Entering the user PIN incorrectly three times will cause the PIN to become blocked; it can be unblocked with either the Admin PIN or Reset Code.
Entering the Admin PIN or Reset Code incorrectly three times destroys all GPG data on the card. The Yubikey will have to be reconfigured.
| Name | Default Value | Use |
|---|---|---|
| PIN | 123456 |
decrypt and authenticate (SSH) |
| Admin PIN | 12345678 |
reset PIN, change Reset Code, add keys and owner information |
| Reset code | None | reset PIN (more information) |
Values are valid up to 127 ASCII characters and must be at least 6 (PIN) or 8 (Admin PIN, Reset Code) characters. See the GnuPG documentation on Managing PINs for details.
To update the GPG PINs on the Yubikey:
gpg/card> passwd
gpg: OpenPGP card no. D2760001240102010006055532110000 detected

1 - change PIN
2 - unblock PIN
3 - change Admin PIN
4 - set the Reset Code
Q - quit

Your selection? 3
PIN changed.

1 - change PIN
2 - unblock PIN
3 - change Admin PIN
4 - set the Reset Code
Q - quit

Your selection? 1
PIN changed.

1 - change PIN
2 - unblock PIN
3 - change Admin PIN
4 - set the Reset Code
Q - quit

Your selection? q
The number of retry attempts can be changed with the following command, documented here:
ykman openpgp set-pin-retries 5 5 5
Set information
Some fields are optional.
gpg/card> name
Cardholder's surname: Duh
Cardholder's given name: Dr

gpg/card> lang
Language preferences: en

gpg/card> login
Login data (account name): doc@duh.to

gpg/card> list

Application ID ...: D2760001240102010006055532110000
Version ..........: 3.4
Manufacturer .....: unknown
Serial number ....: 05553211
Name of cardholder: Dr Duh
Language prefs ...: en
Sex ..............: unspecified
URL of public key : [not set]
Login data .......: doc@duh.to
Private DO 4 .....: [not set]
Signature PIN ....: not forced
Key attributes ...: rsa2048 rsa2048 rsa2048
Max. PIN lengths .: 127 127 127
PIN retry counter : 3 0 3
Signature counter : 0
KDF setting ......: on
Signature key ....: [none]
Encryption key....: [none]
Authentication key: [none]
General key info..: [none]

gpg/card> quit
Transfer keys
Important Transferring keys to YubiKey using keytocard is a destructive, one-way operation only. Make sure you've made a backup before proceeding: keytocard converts the local, on-disk key into a stub, which means the on-disk copy is no longer usable to transfer to subsequent security key devices or mint additional keys.
Previous GPG versions required the toggle command before selecting keys. The currently selected key(s) are indicated with an *. When moving keys only one key should be selected at a time.
$ gpg --edit-key $KEYID

Secret key is available.

sec  rsa4096/0xFF3E7D88647EBCDB
    created: 2017-10-09  expires: never       usage: C
    trust: ultimate      validity: ultimate
ssb  rsa4096/0xBECFA3C1AE191D15
    created: 2017-10-09  expires: 2018-10-09  usage: S
ssb  rsa4096/0x5912A795E90DD2CF
    created: 2017-10-09  expires: 2018-10-09  usage: E
ssb  rsa4096/0x3F29127E79649A3D
    created: 2017-10-09  expires: 2018-10-09  usage: A
[ultimate] (1). Dr Duh <doc@duh.to>
Signing
You will be prompted for the master key passphrase and Admin PIN.
Select and transfer the signature key.
gpg> key 1

sec  rsa4096/0xFF3E7D88647EBCDB
    created: 2017-10-09  expires: never       usage: C
    trust: ultimate      validity: ultimate
ssb* rsa4096/0xBECFA3C1AE191D15
    created: 2017-10-09  expires: 2018-10-09  usage: S
ssb  rsa4096/0x5912A795E90DD2CF
    created: 2017-10-09  expires: 2018-10-09  usage: E
ssb  rsa4096/0x3F29127E79649A3D
    created: 2017-10-09  expires: 2018-10-09  usage: A
[ultimate] (1). Dr Duh <doc@duh.to>

gpg> keytocard
Please select where to store the key:
   (1) Signature key
   (3) Authentication key
Your selection? 1

You need a passphrase to unlock the secret key for
user: "Dr Duh <doc@duh.to>"
4096-bit RSA key, ID 0xBECFA3C1AE191D15, created 2016-05-24
Encryption
Type key 1 again to de-select and key 2 to select the next key:
gpg> key 1

gpg> key 2

sec  rsa4096/0xFF3E7D88647EBCDB
    created: 2017-10-09  expires: never       usage: C
    trust: ultimate      validity: ultimate
ssb  rsa4096/0xBECFA3C1AE191D15
    created: 2017-10-09  expires: 2018-10-09  usage: S
ssb* rsa4096/0x5912A795E90DD2CF
    created: 2017-10-09  expires: 2018-10-09  usage: E
ssb  rsa4096/0x3F29127E79649A3D
    created: 2017-10-09  expires: 2018-10-09  usage: A
[ultimate] (1). Dr Duh <doc@duh.to>

gpg> keytocard
Please select where to store the key:
   (2) Encryption key
Your selection? 2

[...]
Authentication
Type key 2 again to deselect and key 3 to select the last key:
gpg> key 2

gpg> key 3

sec  rsa4096/0xFF3E7D88647EBCDB
    created: 2017-10-09  expires: never       usage: C
    trust: ultimate      validity: ultimate
ssb  rsa4096/0xBECFA3C1AE191D15
    created: 2017-10-09  expires: 2018-10-09  usage: S
ssb  rsa4096/0x5912A795E90DD2CF
    created: 2017-10-09  expires: 2018-10-09  usage: E
ssb* rsa4096/0x3F29127E79649A3D
    created: 2017-10-09  expires: 2018-10-09  usage: A
[ultimate] (1). Dr Duh <doc@duh.to>

gpg> keytocard
Please select where to store the key:
   (3) Authentication key
Your selection? 3
Save and quit:
gpg> save
Verify card
Verify the sub-keys have been moved to YubiKey as indicated by ssb>:
$ gpg -K
/tmp.FLZC0xcM/pubring.kbx
-------------------------------------------------------------------------
sec   rsa4096/0xFF3E7D88647EBCDB 2017-10-09 [C]
      Key fingerprint = 011C E16B D45B 27A5 5BA8  776D FF3E 7D88 647E BCDB
uid                            Dr Duh <doc@duh.to>
ssb>  rsa4096/0xBECFA3C1AE191D15 2017-10-09 [S] [expires: 2018-10-09]
ssb>  rsa4096/0x5912A795E90DD2CF 2017-10-09 [E] [expires: 2018-10-09]
ssb>  rsa4096/0x3F29127E79649A3D 2017-10-09 [A] [expires: 2018-10-09]
Multiple YubiKeys
To provision additional security keys, restore the master key backup and repeat the Configure Smartcard procedure.
$ mv -vi $GNUPGHOME $GNUPGHOME.1
renamed '/tmp.FLZC0xcM' -> '/tmp.FLZC0xcM.1'

$ cp -avi /mnt/encrypted-storage/tmp.XXX $GNUPGHOME
'/mnt/encrypted-storage/tmp.FLZC0xcM' -> '/tmp.FLZC0xcM'

$ cd $GNUPGHOME
Switching between two or more Yubikeys.
When you add a GPG key to a Yubikey using the keytocard command, GPG deletes the key from your keyring and adds a stub pointing to that exact Yubikey (the stub identifies the GPG KeyID and the Yubikey's serial number).
However, when you do this same operation for a second Yubikey, the stub in your keyring is overwritten by the keytocard operation and now the stub points to your second Yubikey. Adding more repeats this overwriting operation.
In other words, the stub will point ONLY to the LAST Yubikey written to.
When using GPG key operations with the GPG key you placed onto the Yubikeys, GPG will request a specific Yubikey asking that you insert a Yubikey with a given serial number (referenced by the stub). GPG will not recognise another Yubikey with a different serial number without manual intervention.
You can force GPG to scan the card and re-create the stubs to point to another Yubikey.
Having created two (or more Yubikeys) with the same GPG key (as described above) where the stubs are pointing to the second Yubikey:
Insert the first Yubikey (which has a different serial number) and run the following command:
$ gpg-connect-agent "scd serialno" "learn --force" /bye
GPG will then scan your first Yubikey for GPG keys and recreate the stubs to point to the GPG keyID and Yubikey Serial number of this first Yubikey.
To return to using the second Yubikey just repeat (insert other Yubikey and re-run command).
Obviously this command is not easy to remember so it is recommended to either create a script or a shell alias to make this more user friendly.
Cleanup
Ensure you have:
- Saved encryption, signing and authentication sub-keys to YubiKey (
gpg -Kshould showssb>for sub-keys). - Saved the YubiKey user and admin PINs which you changed from defaults.
- Saved the password to the GPG master key in a permanent location.
- Saved a copy of the master key, sub-keys and revocation certificate on an encrypted volume, to be stored offline.
- Saved the password to that encrypted volume in a separate location.
- Saved a copy of the public key somewhere easily accessible later.
Reboot or securely delete $GNUPGHOME and remove the secret keys from the GPG keyring:
$ sudo srm -r $GNUPGHOME || sudo rm -rf $GNUPGHOME

$ gpg --delete-secret-key $KEYID

$ unset GNUPGHOME
Important Make sure you have securely erased all generated keys and revocation certificates if an ephemeral enviroment was not used!
Using keys
Download drduh/config/gpg.conf:
$ cd ~/.gnupg ; wget https://raw.githubusercontent.com/drduh/config/master/gpg.conf

$ chmod 600 gpg.conf
Install the required packages and mount the non-encrypted volume created earlier:
Linux
$ sudo apt update && sudo apt install -y gnupg2 gnupg-agent gnupg-curl scdaemon pcscd

$ sudo mount /dev/mmcblk0p2 /mnt
OpenBSD
$ doas pkg_add gnupg pcsc-tools

$ doas mount /dev/sd2b /mnt
Import the public key file:
$ gpg --import /mnt/gpg-0x*.asc
gpg: key 0xFF3E7D88647EBCDB: public key "Dr Duh <doc@duh.to>" imported
gpg: Total number processed: 1
gpg:               imported: 1
Or download the public key from a keyserver:
$ gpg --recv $KEYID
gpg: requesting key 0xFF3E7D88647EBCDB from hkps server hkps.pool.sks-keyservers.net
[...]
gpg: key 0xFF3E7D88647EBCDB: public key "Dr Duh <doc@duh.to>" imported
gpg: Total number processed: 1
gpg:               imported: 1
Edit the master key to assign it ultimate trust by selecting trust and 5:
$ export KEYID=0xFF3E7D88647EBCDB

$ gpg --edit-key $KEYID

gpg> trust
pub  4096R/0xFF3E7D88647EBCDB  created: 2016-05-24  expires: never       usage: C
                               trust: unknown       validity: unknown
sub  4096R/0xBECFA3C1AE191D15  created: 2017-10-09  expires: 2018-10-09  usage: S
sub  4096R/0x5912A795E90DD2CF  created: 2017-10-09  expires: 2018-10-09  usage: E
sub  4096R/0x3F29127E79649A3D  created: 2017-10-09  expires: 2018-10-09  usage: A
[ unknown] (1). Dr Duh <doc@duh.to>

Please decide how far you trust this user to correctly verify other users' keys
(by looking at passports, checking fingerprints from different sources, etc.)

  1 = I don't know or won't say
  2 = I do NOT trust
  3 = I trust marginally
  4 = I trust fully
  5 = I trust ultimately
  m = back to the main menu

Your decision? 5
Do you really want to set this key to ultimate trust? (y/N) y

pub  4096R/0xFF3E7D88647EBCDB  created: 2016-05-24  expires: never       usage: C
                               trust: ultimate      validity: unknown
sub  4096R/0xBECFA3C1AE191D15  created: 2017-10-09  expires: 2018-10-09  usage: S
sub  4096R/0x5912A795E90DD2CF  created: 2017-10-09  expires: 2018-10-09  usage: E
sub  4096R/0x3F29127E79649A3D  created: 2017-10-09  expires: 2018-10-09  usage: A
[ unknown] (1). Dr Duh <doc@duh.to>

gpg> quit
Remove and re-insert YubiKey and check the status:
$ gpg --card-status
Reader ...........: Yubico YubiKey OTP FIDO CCID 00 00
Application ID ...: D2760001240102010006055532110000
Version ..........: 3.4
Manufacturer .....: Yubico
Serial number ....: 05553211
Name of cardholder: Dr Duh
Language prefs ...: en
Sex ..............: unspecified
URL of public key : [not set]
Login data .......: doc@duh.to
Signature PIN ....: not forced
Key attributes ...: rsa4096 rsa4096 rsa4096
Max. PIN lengths .: 127 127 127
PIN retry counter : 3 3 3
Signature counter : 0
KDF setting ......: on
Signature key ....: 07AA 7735 E502 C5EB E09E  B8B0 BECF A3C1 AE19 1D15
      created ....: 2016-05-24 23:22:01
Encryption key....: 6F26 6F46 845B BEB8 BDF3  7E9B 5912 A795 E90D D2CF
      created ....: 2016-05-24 23:29:03
Authentication key: 82BE 7837 6A3F 2E7B E556  5E35 3F29 127E 7964 9A3D
      created ....: 2016-05-24 23:36:40
General key info..: pub  4096R/0xBECFA3C1AE191D15 2016-05-24 Dr Duh <doc@duh.to>
sec#  4096R/0xFF3E7D88647EBCDB  created: 2016-05-24  expires: never
ssb>  4096R/0xBECFA3C1AE191D15  created: 2017-10-09  expires: 2018-10-09
                      card-no: 0006 05553211
ssb>  4096R/0x5912A795E90DD2CF  created: 2017-10-09  expires: 2018-10-09
                      card-no: 0006 05553211
ssb>  4096R/0x3F29127E79649A3D  created: 2017-10-09  expires: 2018-10-09
                      card-no: 0006 05553211
sec# indicates the master key is not available (as it should be stored encrypted offline).
Note If you see General key info..: [none] in the output instead - go back and import the public key using the previous step.
Encrypt a message to your own key (useful for storing password credentials and other data):
$ echo "test message string" | gpg --encrypt --armor --recipient $KEYID -o encrypted.txt
To encrypt to multiple recipients (or to multiple keys):
$ echo "test message string" | gpg --encrypt --armor --recipient $KEYID_0 --recipient $KEYID_1 --recipient $KEYID_2 -o encrypted.txt
Decrypt the message:
$ gpg --decrypt --armor encrypted.txt
gpg: anonymous recipient; trying secret key 0x0000000000000000 ...
gpg: okay, we are the anonymous recipient.
gpg: encrypted with RSA key, ID 0x0000000000000000
test message string
Sign a message:
$ echo "test message string" | gpg --armor --clearsign > signed.txt
Verify the signature:
$ gpg --verify signed.txt
gpg: Signature made Wed 25 May 2016 00:00:00 AM UTC
gpg:                using RSA key 0xBECFA3C1AE191D15
gpg: Good signature from "Dr Duh <doc@duh.to>" [ultimate]
Primary key fingerprint: 011C E16B D45B 27A5 5BA8  776D FF3E 7D88 647E BCDB
     Subkey fingerprint: 07AA 7735 E502 C5EB E09E  B8B0 BECF A3C1 AE19 1D15
Use a shell function to make encrypting files easier:
secret () {
        output=~/"${1}".$(date +%s).enc
        gpg --encrypt --armor --output ${output} -r 0x0000 -r 0x0001 -r 0x0002 "${1}" && echo "${1} -> ${output}"
}

reveal () {
        output=$(echo "${1}" | rev | cut -c16- | rev)
        gpg --decrypt --output ${output} "${1}" && echo "${1} -> ${output}"
}
$ secret document.pdf
document.pdf -> document.pdf.1580000000.enc

$ reveal document.pdf.1580000000.enc
gpg: anonymous recipient; trying secret key 0xFF3E7D88647EBCDB ...
gpg: okay, we are the anonymous recipient.
gpg: encrypted with RSA key, ID 0x0000000000000000
document.pdf.1580000000.enc -> document.pdf
Rotating keys
PGP does not provide forward secrecy - a compromised key may be used to decrypt all past messages. Although keys stored on YubiKey are difficult to steal, it is not impossible - the key and PIN could be taken, or a vulnerability may be discovered in key hardware or the random number generator used to create them, for example. Therefore, it is good practice to occassionally rotate sub-keys.
When a sub-key expires, it can either be renewed or replaced. Both actions require access to the offline master key. Renewing sub-keys by updating their expiration date indicates you are still in possession of the offline master key and is more convenient.
Replacing keys, on the other hand, is less convenient but more secure: the new sub-keys will not be able to decrypt previous messages, authenticate with SSH, etc. Contacts will need to receive the updated public key and any encrypted secrets need to be decrypted and re-encrypted to new sub-keys to be usable. This process is functionally equivalent to "losing" the YubiKey and provisioning a new one. However, you will always be able to decrypt previous messages using the offline encrypted backup of the original keys.
Neither rotation method is superior and it's up to personal philosophy on identity management and individual threat model to decide which one to use, or whether to expire sub-keys at all. Ideally, sub-keys would be ephemeral: used only once for each encryption, signing and authentication event, however in practice that is not really feasible nor worthwhile with YubiKey. Advanced users may want to dedicate an offline device for more frequent key rotations and ease of provisioning.
Setup environment
To renew or rotate sub-keys, follow the same process as generating keys: boot to a secure environment, install required software and disconnect networking.
Connect the offline secret storage device with the master keys and identify the disk label:
$ sudo dmesg | tail
mmc0: new high speed SDHC card at address a001
mmcblk0: mmc0:a001 SS16G 14.8 GiB (ro)
mmcblk0: p1 p2
Decrypt and mount the offline volume:
$ sudo cryptsetup luksOpen /dev/mmcblk0p1 secret
Enter passphrase for /dev/mmcblk0p1:

$ sudo mount /dev/mapper/secret /mnt/encrypted-storage
Import the master key and configuration to a temporary working directory. Note that Windows users should import mastersub.gpg:
$ export GNUPGHOME=$(mktemp -d -t gnupg_$(date +%Y%m%d%H%M)_XXX)

$ gpg --import /mnt/encrypted-storage/tmp.XXX/mastersub.key

$ cp -v /mnt/encrypted-storage/tmp.XXX/gpg.conf $GNUPGHOME
Edit the master key:
$ export KEYID=0xFF3E7D88647EBCDB

$ gpg --expert --edit-key $KEYID

Secret key is available
[...]
Renewing sub-keys
Renewing sub-keys is simpler: you do not need to generate new keys, move keys to the YubiKey, or update any SSH public keys linked to the GPG key. All you need to do is to change the expiry time associated with the public key (which requires access to the master key you just loaded) and then to export that public key and import it on any computer where you wish to use the GPG (as distinct from the SSH) key.
To change the expiration date of all sub-keys, start by selecting all keys:
$ gpg --edit-key $KEYID

Secret key is available.

sec  rsa4096/0xFF3E7D88647EBCDB
    created: 2017-10-09  expires: never       usage: C
    trust: ultimate      validity: ultimate
ssb  rsa4096/0xBECFA3C1AE191D15
    created: 2017-10-09  expires: 2018-10-09  usage: S
ssb  rsa4096/0x5912A795E90DD2CF
    created: 2017-10-09  expires: 2018-10-09  usage: E
ssb  rsa4096/0x3F29127E79649A3D
    created: 2017-10-09  expires: 2018-10-09  usage: A
[ultimate] (1). Dr Duh <doc@duh.to>

gpg> key 1

Secret key is available.

sec  rsa4096/0xFF3E7D88647EBCDB
     created: 2017-10-09  expires: never       usage: C
     trust: ultimate      validity: ultimate
ssb* rsa4096/0xBECFA3C1AE191D15
     created: 2017-10-09  expires: 2018-10-09  usage: S
ssb  rsa4096/0x5912A795E90DD2CF
     created: 2017-10-09  expires: 2018-10-09  usage: E
ssb  rsa4096/0x3F29127E79649A3D
     created: 2017-10-09  expires: 2018-10-09  usage: A
[ultimate] (1). Dr Duh <doc@duh.to>

gpg> key 2

Secret key is available.

sec  rsa4096/0xFF3E7D88647EBCDB
     created: 2017-10-09  expires: never       usage: C
     trust: ultimate      validity: ultimate
ssb* rsa4096/0xBECFA3C1AE191D15
     created: 2017-10-09  expires: 2018-10-09  usage: S
ssb* rsa4096/0x5912A795E90DD2CF
     created: 2017-10-09  expires: 2018-10-09  usage: E
ssb  rsa4096/0x3F29127E79649A3D
     created: 2017-10-09  expires: 2018-10-09  usage: A
[ultimate] (1). Dr Duh <doc@duh.to>

gpg> key 3

Secret key is available.

sec   rsa4096/0xFF3E7D88647EBCDB
      created: 2017-10-09  expires: never       usage: C
      trust: ultimate      validity: ultimate
ssb*  rsa4096/0xBECFA3C1AE191D15
      created: 2017-10-09  expires: 2018-10-09  usage: S
ssb*  rsa4096/0x5912A795E90DD2CF
      created: 2017-10-09  expires: 2018-10-09  usage: E
ssb*  rsa4096/0x3F29127E79649A3D
      created: 2017-10-09  expires: 2018-10-09  usage: A
[ultimate] (1). Dr Duh <doc@duh.to>
Then, use the expire command to set a new expiration date. (Despite the name, this will not cause currently valid keys to become expired.)
gpg> expire
Changing expiration time for a subkey.
Please specify how long the key should be valid.
         0 = key does not expire
      <n>  = key expires in n days
      <n>w = key expires in n weeks
      <n>m = key expires in n months
      <n>y = key expires in n years
Key is valid for? (0)
Follow these prompts to set a new expiration date, then save to save your changes.
Next, export the public key:
$ gpg --armor --export $KEYID > gpg-$KEYID-$(date +%F).asc
Transfer that public key to the computer from which you use your GPG key, and then import it with:
$ gpg --import gpg-0x*.asc
This will extend the validity of your GPG key and will allow you to use it for SSH authorization. Note that you do not need to update the SSH public key located on remote servers.
Rotating keys
Rotating keys is more a bit more involved. First, follow the original steps to generate each sub-key. Previous sub-keys may be kept or deleted from the identity.
Finish by exporting new keys:
$ gpg --armor --export-secret-keys $KEYID > $GNUPGHOME/mastersub.key

$ gpg --armor --export-secret-subkeys $KEYID > $GNUPGHOME/sub.key
Copy the new temporary working directory to encrypted offline storage, which should still be mounted:
$ sudo cp -avi $GNUPGHOME /mnt/encrypted-storage
There should now be at least two versions of the master and sub-keys backed up:
$ ls /mnt/encrypted-storage
lost+found  tmp.ykhTOGjR36  tmp.2gyGnyCiHs
Unmount and close the encrypted volume:
$ sudo umount /mnt/encrypted-storage

$ sudo cryptsetup luksClose /dev/mapper/secret
Export the updated public key:
$ sudo mkdir /mnt/public

$ sudo mount /dev/mmcblk0p2 /mnt/public

$ gpg --armor --export $KEYID | sudo tee /mnt/public/$KEYID-$(date +%F).asc

$ sudo umount /mnt/public
Disconnect the storage device and follow the original steps to transfer new keys (4, 5 and 6) to the YubiKey, replacing existing ones. Reboot or securely erase the GPG temporary working directory.
Adding notations
Notations can be added to user ID(s) and can be used in conjunction with Keyoxide to create OpenPGP identity proofs.
Adding notations requires access to the master key so we can follow the setup instructions taken from this section of this guide.
Please note that there is no need to connect the Yubikey to the setup environment and that we do not need to generate new keys, move keys to the YubiKey, or update any SSH public keys linked to the GPG key.
After having completed the environment setup, it is possible to follow any of the guides listed under "Adding proofs" in the Keyoxide "Guides" page up until the notation is saved using the save command.
At this point the public key can be exported:
$ gpg --export $KEYID > pubkey.asc
The public key can now be transferred to the computer where the GPG key is used and it is imported with:
$ gpg --import pubkey.asc
N.B.: The showpref command can be issued to ensure that the notions were correctly added.
It is now possible to continue following the Keyoxide guide and upload the key to WKD or to keys.openpgp.org.
SSH
Note that if you want to use a YubiKey ONLY for SSH (and don't really care about PGP/GPG), then since OpenSSH v8.2 you alternatively can simply ssh-keygen -t ed25519-sk (without requiring anything else from this guide!), as explained e.g. in this guide. Yubico also recently announced support for resident ssh keys under OpenSSH 8.2+ on their blue "security key 5 nfc" as mentioned in their blog post.
gpg-agent supports the OpenSSH ssh-agent protocol (enable-ssh-support), as well as Putty's Pageant on Windows (enable-putty-support). This means it can be used instead of the traditional ssh-agent / pageant. There are some differences from ssh-agent, notably that gpg-agent does not cache keys rather it converts, encrypts and stores them - persistently - as GPG keys and then makes them available to ssh clients. Any existing ssh private keys that you'd like to keep in gpg-agent should be deleted after they've been imported to the GPG agent.
When importing the key to gpg-agent, you'll be prompted for a passphrase to protect that key within GPG's key store - you may want to use the same passphrase as the original's ssh version. GPG can both cache passphrases for a determined period (ref. gpg-agent's various cache-ttl options), and since version 2.1 can store and fetch passphrases via the macOS keychain. Note than when removing the old private key after importing to gpg-agent, keep the .pub key file around for use in specifying ssh identities (e.g. ssh -i /path/to/identity.pub).
Probably the biggest thing missing from gpg-agent's ssh agent support is being able to remove keys. ssh-add -d/-D have no effect. Instead, you need to use the gpg-connect-agent utility to lookup a key's keygrip, match that with the desired ssh key fingerprint (as an MD5) and then delete that keygrip. The gnupg-users mailing list has more information.
Create configuration
Create a hardened configuration for gpg-agent by downloading drduh/config/gpg-agent.conf:
$ cd ~/.gnupg

$ wget https://raw.githubusercontent.com/drduh/config/master/gpg-agent.conf

$ grep -ve "^#" gpg-agent.conf
enable-ssh-support
default-cache-ttl 60
max-cache-ttl 120
pinentry-program /usr/bin/pinentry-curses
Important The cache-ttl options do NOT apply when using a YubiKey as a smartcard as the PIN is cached by the smartcard itself. Therefore, in order to clear the PIN from cache (smartcard equivalent to default-cache-ttl and max-cache-ttl), you need to unplug the YubiKey.
Tip Set pinentry-program /usr/bin/pinentry-gnome3 for a GUI-based prompt. If the pinentry graphical dialog doesn't show and you get this error: sign_and_send_pubkey: signing failed: agent refused operation, you may need to install the dbus-user-session package and restart the computer for the dbus user session to be fully inherited; this is because behind the scenes, pinentry complains about No $DBUS_SESSION_BUS_ADDRESS found, falls back to curses but doesn't find the expected tty.
On macOS, use brew install pinentry-mac and set the program path to pinentry-program /usr/local/bin/pinentry-mac for Intel Macs, /opt/homebrew/bin/pinentry-mac for ARM/Apple Silicon Macs or pinentry-program /usr/local/MacGPG2/libexec/pinentry-mac.app/Contents/MacOS/pinentry-mac if using MacGPG Suite.
Replace agents
To launch gpg-agent for use by SSH, use the gpg-connect-agent /bye or gpgconf --launch gpg-agent commands.
Add these to the shell rc file:
export GPG_TTY="$(tty)"
export SSH_AUTH_SOCK="/run/user/$UID/gnupg/S.gpg-agent.ssh"
gpg-connect-agent updatestartuptty /bye > /dev/null
On modern systems, gpgconf --list-dirs agent-ssh-socket will automatically set SSH_AUTH_SOCK to the correct value and is better than hard-coding to run/user/$UID/gnupg/S.gpg-agent.ssh, if available:
export GPG_TTY="$(tty)"
export SSH_AUTH_SOCK=$(gpgconf --list-dirs agent-ssh-socket)
gpgconf --launch gpg-agent
If you use fish, the correct lines for your config.fish would look like this (consider putting them into the is-interactive block depending on your use case):
set -x GPG_TTY (tty)
set -x SSH_AUTH_SOCK (gpgconf --list-dirs agent-ssh-socket)
gpgconf --launch gpg-agent
Note that if you use ForwardAgent for ssh-agent forwarding, SSH_AUTH_SOCK only needs to be set on the local laptop (workstation), where the YubiKey is plugged in. On the remote server that we SSH into, ssh will automatically set SSH_AUTH_SOCK to something like /tmp/ssh-mXzCzYT2Np/agent.7541 when we connect. We therefore do NOT manually set SSH_AUTH_SOCK on the server - doing so would break SSH Agent Forwarding.
If you use S.gpg-agent.ssh (see SSH Agent Forwarding for more info), SSH_AUTH_SOCK should also be set on the remote. However, GPG_TTY should not be set on the remote, explanation specified in that section.
Copy public key
Note It is not necessary to import the corresponding GPG public key in order to use SSH.
Copy and paste the output from ssh-add to the server's authorized_keys file:
$ ssh-add -L
ssh-rsa AAAAB4NzaC1yc2EAAAADAQABAAACAz[...]zreOKM+HwpkHzcy9DQcVG2Nw== cardno:000605553211
(Optional) Save public key for identity file configuration
By default, SSH attempts to use all the identities available via the agent. It's often a good idea to manage exactly which keys SSH will use to connect to a server, for example to separate different roles or to avoid being fingerprinted by untrusted ssh servers. To do this you'll need to use the command line argument -i [identity_file] or the IdentityFile and IdentitiesOnly options in .ssh/config.
The argument provided to IdentityFile is traditionally the path to the private key file (for example IdentityFile ~/.ssh/id_rsa). For the YubiKey - indeed, in general for keys stored in an ssh agent - IdentityFile should point to the public key file, ssh will select the appropriate private key from those available via the ssh agent. To prevent ssh from trying all keys in the agent use the IdentitiesOnly yes option along with one or more -i or IdentityFile options for the target host.
To reiterate, with IdentitiesOnly yes, ssh will not automatically enumerate public keys loaded into ssh-agent or gpg-agent. This means publickey authentication will not proceed unless explicitly named by ssh -i [identity_file] or in .ssh/config on a per-host basis.
In the case of YubiKey usage, to extract the public key from the ssh agent:
$ ssh-add -L | grep "cardno:000605553211" > ~/.ssh/id_rsa_yubikey.pub
Then you can explicitly associate this YubiKey-stored key for used with a host, github.com for example, as follows:
$ cat << EOF >> ~/.ssh/config
Host github.com
    IdentitiesOnly yes
    IdentityFile ~/.ssh/id_rsa_yubikey.pub
EOF
Connect with public key authentication
$ ssh git@github.com -vvv
[...]
debug2: key: cardno:000605553211 (0x1234567890),
debug1: Authentications that can continue: publickey
debug3: start over, passed a different list publickey
debug3: preferred gssapi-keyex,gssapi-with-mic,publickey,keyboard-interactive,password
debug3: authmethod_lookup publickey
debug3: remaining preferred: keyboard-interactive,password
debug3: authmethod_is_enabled publickey
debug1: Next authentication method: publickey
debug1: Offering RSA public key: cardno:000605553211
debug3: send_pubkey_test
debug2: we sent a publickey packet, wait for reply
debug1: Server accepts key: pkalg ssh-rsa blen 535
debug2: input_userauth_pk_ok: fp e5:de:a5:74:b1:3e:96:9b:85:46:e7:28:53:b4:82:c3
debug3: sign_and_send_pubkey: RSA e5:de:a5:74:b1:3e:96:9b:85:46:e7:28:53:b4:82:c3
debug1: Authentication succeeded (publickey).
[...]
Tip To make multiple connections or securely transfer many files, consider using the ControlMaster ssh option. Also see drduh/config/ssh_config.
Import SSH keys
If there are existing SSH keys that you wish to make available via gpg-agent, you'll need to import them. You should then remove the original private keys. When importing the key, gpg-agent uses the key's filename as the key's label; this makes it easier to follow where the key originated from. In this example, we're starting with just the YubiKey's key in place and importing ~/.ssh/id_rsa:
$ ssh-add -l
4096 SHA256:... cardno:00060123456 (RSA)

$ ssh-add ~/.ssh/id_rsa && rm ~/.ssh/id_rsa
When invoking ssh-add, it will prompt for the SSH key's passphrase if present, then the pinentry program will prompt and confirm for a new passphrase to use to encrypt the converted key within the GPG key store.
The migrated key will be listed in ssh-add -l:
$ ssh-add -l
4096 SHA256:... cardno:00060123456 (RSA)
2048 SHA256:... /Users/username/.ssh/id_rsa (RSA)
Or to show the keys with MD5 fingerprints, as used by gpg-connect-agent's KEYINFO and DELETE_KEY commands:
$ ssh-add -E md5 -l
4096 MD5:... cardno:00060123456 (RSA)
2048 MD5:... /Users/username/.ssh/id_rsa (RSA)
When using the key pinentry will be invoked to request the key's passphrase. The passphrase will be cached for up to 10 minutes idle time between uses, to a maximum of 2 hours.
Remote Machines (SSH Agent Forwarding)
Note SSH Agent Forwarding can add additional risk - proceed with caution!
There are two methods for ssh-agent forwarding, one is provided by OpenSSH and the other is provided by GnuPG.
The latter one may be more insecure as raw socket is just forwarded (not like S.gpg-agent.extra with only limited functionality; if ForwardAgent implemented by OpenSSH is just forwarding the raw socket, then they are insecure to the same degree). But for the latter one, one convenience is that one may forward once and use this agent everywhere in the remote. So again, proceed with caution!
For example, tmux does not have some environment variables like $SSH_AUTH_SOCK when you ssh into remote and attach an old tmux session. In this case if you use ForwardAgent, you need to find the socket manually and export SSH_AUTH_SOCK=/tmp/ssh-agent-xxx/xxxx.socket for each shell. But with S.gpg-agent.ssh in fixed place, one can just use it as ssh-agent in their shell rc file.
Use ssh-agent
In the above steps, you have successfully configured a local ssh-agent.
You should now be able to use ssh -A remote on the local machine to log into remote, and should then be able to use YubiKey as if it were connected to the remote machine. For example, using e.g. ssh-add -l on that remote machine should show the public key from the YubiKey (note cardno:). (If you don't want to have to remember to use ssh -A, you can use ForwardAgent yes in ~/.ssh/config. As a security best practice, always use ForwardAgent yes only for a single Hostname, never for all servers.)
Use S.gpg-agent.ssh
First you need to go through Remote Machines (GPG Agent Forwarding), know the conditions for gpg-agent forwarding and know the location of S.gpg-agent.ssh on both the local and the remote.
You may use the command:
$ gpgconf --list-dirs agent-ssh-socket
Then in your .ssh/config add one sentence for that remote
Host
  Hostname remote-host.tld
  StreamLocalBindUnlink yes
  RemoteForward /run/user/1000/gnupg/S.gpg-agent.ssh /run/user/1000/gnupg/S.gpg-agent.ssh
  # RemoteForward [remote socket] [local socket]
  # Note that ForwardAgent is not wanted here!
After successfully ssh into the remote, you should check that you have /run/user/1000/gnupg/S.gpg-agent.ssh lying there.
Then in the remote you can type in command line or configure in the shell rc file with:
export SSH_AUTH_SOCK="/run/user/$UID/gnupg/S.gpg-agent.ssh"
After typing or sourcing your shell rc file, with ssh-add -l you should find your ssh public key now.
Note In this process no gpg-agent in the remote is involved, hence gpg-agent.conf in the remote is of no use. Also pinentry is invoked locally.
Chained SSH Agent Forwarding
If you use ssh-agent provided by OpenSSH and want to forward it into a third box, you can just ssh -A third on the remote.
Meanwhile, if you use S.gpg-agent.ssh, assume you have gone through the steps above and have S.gpg-agent.ssh on the remote, and you would like to forward this agent into a third box, first you may need to configure sshd_config and SSH_AUTH_SOCK of third in the same way as remote, then in the ssh config of remote, add the following lines
Host third
  Hostname third-host.tld
  StreamLocalBindUnlink yes
  RemoteForward /run/user/1000/gnupg/S.gpg-agent.ssh /run/user/1000/gnupg/S.gpg-agent.ssh
  # RemoteForward [remote socket] [local socket]
  # Note that ForwardAgent is not wanted here!
You should change the path according to gpgconf --list-dirs agent-ssh-socket on remote and third.
GitHub
You can use YubiKey to sign GitHub commits and tags. It can also be used for GitHub SSH authentication, allowing you to push, pull, and commit without a password.
Login to GitHub and upload SSH and PGP public keys in Settings.
To configure a signing key:
> git config --global user.signingkey $KEYID
Make sure the user.email option matches the email address associated with the PGP identity.
Now, to sign commits or tags simply use the -S option. GPG will automatically query YubiKey and prompt you for a PIN.
To authenticate:
Windows
Run the following commands:
> git config --global core.sshcommand 'plink -agent'
> git config --global gpg.program 'C:\Program Files (x86)\GnuPG\bin\gpg.exe'
You can then change the repository url to git@github.com:USERNAME/repository and any authenticated commands will be authorized by YubiKey.
Note If you encounter the error gpg: signing failed: No secret key - run gpg --card-status with YubiKey plugged in and try the git command again.
OpenBSD
Install and enable tools for use with PC/SC drivers, cards, readers, then reboot to recognize YubiKey:
$ doas pkg_add pcsc-tools

$ doas rcctl enable pcscd

$ doas reboot
Windows
Windows can already have some virtual smartcard readers installed, like the one provided for Windows Hello. To ensure your YubiKey is the correct one used by scdaemon, you should add it to its configuration. You will need your device's full name. To find your device's full name, plug in your YubiKey and open PowerShell to run the following command:
PS C:\WINDOWS\system32> Get-PnpDevice -Class SoftwareDevice | Where-Object {$_.FriendlyName -like "*YubiKey*"} | Select-Object -ExpandProperty FriendlyName
Yubico YubiKey OTP+FIDO+CCID 0
The name slightly differs according to the model. Thanks to Scott Hanselman for sharing this information.
- Create or edit
%APPDATA%/gnupg/scdaemon.confto add:
reader-port <your yubikey device's full name, e.g. Yubico YubiKey OTP+FIDO+CCID 0>
- Create or edit
%APPDATA%/gnupg/gpg-agent.confto add:
enable-ssh-support
enable-putty-support
- Open a command console, restart the agent:
> gpg-connect-agent killagent /bye
> gpg-connect-agent /bye
- Enter
> gpg --card-statusto see YubiKey details. - Import the public key:
> gpg --import <path to public key file> - Trust the master key
- Retrieve the public key id:
> gpg --list-public-keys - Export the SSH key from GPG:
> gpg --export-ssh-key <public key id>
Copy this key to a file for later use. It represents the public SSH key corresponding to the secret key on the YubiKey. You can upload this key to any server you wish to SSH into.
Create a shortcut that points to gpg-connect-agent /bye and place it in the startup folder shell:startup to make sure the agent starts after a system shutdown. Modify the shortcut properties so it starts in a "Minimized" window, to avoid unnecessary noise at startup.
Now you can use PuTTY for public key SSH authentication. When the server asks for public key verification, PuTTY will forward the request to GPG, which will prompt you for a PIN and authorize the login using YubiKey.
WSL
The goal here is to make the SSH client inside WSL work together with the Windows agent you are using (gpg-agent.exe in our case). Here is what we are going to achieve:
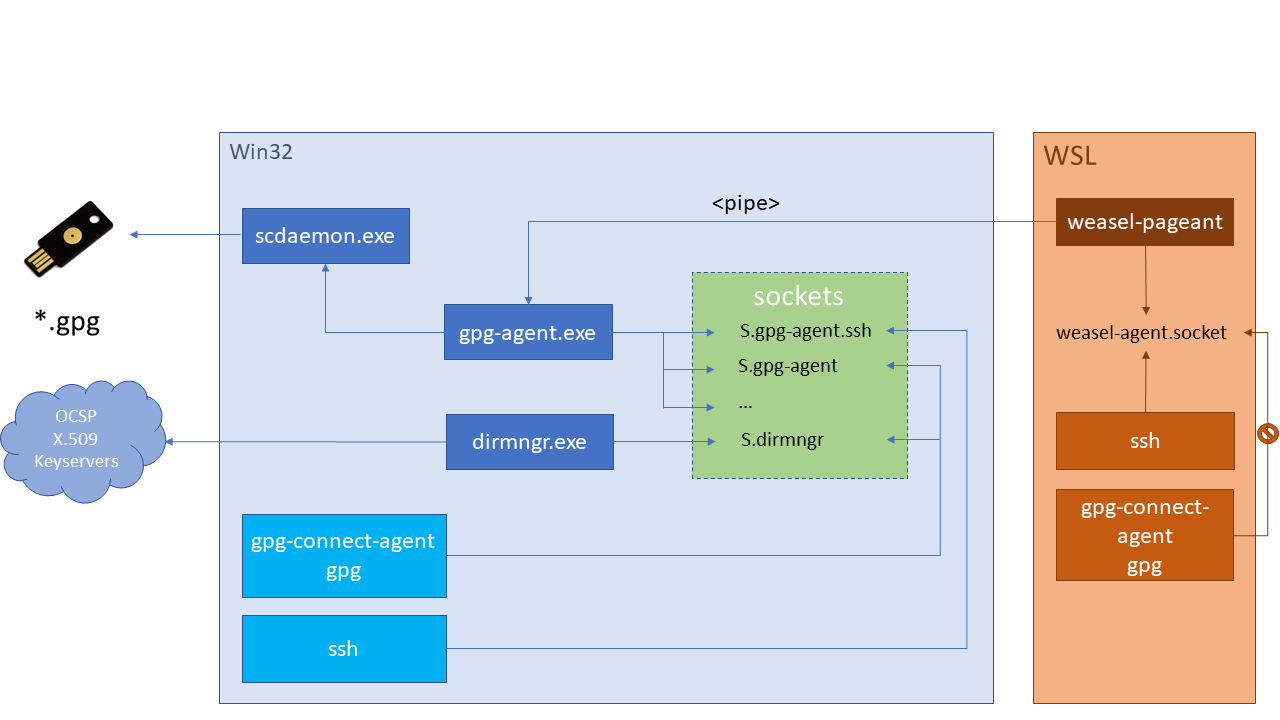
Note this works only for SSH agent forwarding. Real GPG forwarding (encryption/decryption) is actually not supported. See the weasel-pageant readme for further information.
Use ssh-agent or use S.weasel-pegant
One way to forward is just ssh -A (still need to eval weasel to setup local ssh-agent), and only relies on OpenSSH. In this track, ForwardAgent and AllowAgentForwarding in ssh/sshd config may be involved; However, if you use the other way (gpg ssh socket forwarding), you should not enable ForwardAgent in ssh config. See SSH Agent Forwarding for more info.
Another way is to forward the gpg ssh socket, as described below.
Prerequisites
- Ubuntu 16.04 or newer for WSL
- Kleopatra
- Windows configuration
WSL configuration
Download or clone weasel-pageant.
Add eval $(/mnt/c/<path of extraction>/weasel-pageant -r -a /tmp/S.weasel-pageant) to shell rc file. Use a named socket here so it can be used in the RemoteForward directive of ~/.ssh/config. Source it with source ~/.bashrc.
Display the SSH key with $ ssh-add -l
Edit ~/.ssh/config to add the following for each host you want to use agent forwarding:
RemoteForward <remote SSH socket path> /tmp/S.weasel-pageant
Note The remote SSH socket path can be found with gpgconf --list-dirs agent-ssh-socket
Remote host configuration
You may have to add the following to the shell rc file.
export SSH_AUTH_SOCK=$(gpgconf --list-dirs agent-ssh-socket)
Add the following to /etc/ssh/sshd_config:
StreamLocalBindUnlink yes
And reload the SSH daemon (e.g., sudo service sshd reload).
Unplug YubiKey, disconnect or reboot. Log back into Windows, open a WSL console and enter ssh-add -l - you should see nothing.
Plug in YubiKey, enter the same command to display the ssh key.
Log into the remote host, you should have the pinentry dialog asking for the YubiKey pin.
On the remote host, type ssh-add -l - if you see the ssh key, that means forwarding works!
Note Agent forwarding may be chained through multiple hosts - just follow the same protocol to configure each host. You may also read this part on chained ssh agent forwarding.
macOS
To use gui applications on macOS, a little bit more setup is needed.
Create $HOME/Library/LaunchAgents/gnupg.gpg-agent.plist with the following contents:
<?xml version="1.0" encoding="UTF-8"?>
<!DOCTYPE plist PUBLIC "-//Apple//DTD PLIST 1.0//EN"
  "http://www.apple.com/DTDs/PropertyList-1.0.dtd">
<plist version="1.0">
    <dict>
        <key>Label</key>
        <string>gnupg.gpg-agent</string>
        <key>RunAtLoad</key>
        <true/>
        <key>KeepAlive</key>
        <false/>
        <key>ProgramArguments</key>
        <array>
            <string>/usr/local/MacGPG2/bin/gpg-connect-agent</string>
            <string>/bye</string>
        </array>
    </dict>
</plist>
launchctl load $HOME/Library/LaunchAgents/gnupg.gpg-agent.plist
Create $HOME/Library/LaunchAgents/gnupg.gpg-agent-symlink.plist with the following contens:
<?xml version="1.0" encoding="UTF-8"?>
<!DOCTYPE plist PUBLIC "-//Apple//DTD PLIST 1.0//EN" "http://www.apple.com/DTDs/ProperyList-1.0/dtd">
<plist version="1.0">
    <dict>
        <key>Label</key>
        <string>gnupg.gpg-agent-symlink</string>
        <key>ProgramArguments</key>
        <array>
            <string>/bin/sh</string>
            <string>-c</string>
            <string>/bin/ln -sf $HOME/.gnupg/S.gpg-agent.ssh $SSH_AUTH_SOCK</string>
        </array>
        <key>RunAtLoad</key>
        <true/>
    </dict>
</plist>
launchctl load $HOME/Library/LaunchAgents/gnupg.gpg-agent-symlink.plist
You will need to either reboot, or log out and log back in, in order to activate these changes.
Remote Machines (GPG Agent Forwarding)
This section is different from ssh-agent forwarding in SSH as gpg-agent forwarding has a broader usage, not only limited to ssh.
To use YubiKey to sign a git commit on a remote host, or signing email/decrypt files on a remote host, configure and use GPG Agent Forwarding. To ssh through another network, especially to push to/pull from GitHub using ssh, see Remote Machines (SSH Agent forwarding) for more info.
To do this, you need access to the remote machine and the YubiKey has to be set up on the host machine.
After gpg-agent forwarding, it is nearly the same as if YubiKey was inserted in the remote. Hence configurations except gpg-agent.conf for the remote can be the same as those for the local.
Important gpg-agent.conf for the remote is of no use, hence $GPG_TTY is of no use too for the remote. The mechanism is that after forwarding, remote gpg directly communicates with S.gpg-agent without starting gpg-agent on the remote.
On the remote machine, edit /etc/ssh/sshd_config to set StreamLocalBindUnlink yes
Optional If you do not have root access to the remote machine to edit /etc/ssh/sshd_config, you will need to remove the socket (located at gpgconf --list-dir agent-socket) on the remote machine before forwarding works. For example, rm /run/user/1000/gnupg/S.gpg-agent. Further information can be found on the AgentForwarding GNUPG wiki page.
Import public keys to the remote machine. This can be done by fetching from a keyserver. On the local machine, copy the public keyring to the remote machine:
$ scp ~/.gnupg/pubring.kbx remote:~/.gnupg/
On modern distributions, such as Fedora 30, there is typically no need to also set RemoteForward in ~/.ssh/config as detailed in the next chapter, because the right thing happens automatically.
If any error happens (or there is no gpg-agent.socket in the remote) for modern distributions, you may go through the configuration steps in the next section.
Steps for older distributions
On the local machine, run:
$ gpgconf --list-dirs agent-extra-socket
This should return a path to agent-extra-socket - /run/user/1000/gnupg/S.gpg-agent.extra - though on older Linux distros (and macOS) it may be /home/<user>/.gnupg/S/gpg-agent.extra
Find the agent socket on the remote machine:
$ gpgconf --list-dirs agent-socket
This should return a path such as /run/user/1000/gnupg/S.gpg-agent
Finally, enable agent forwarding for a given machine by adding the following to the local machine's ssh config file ~/.ssh/config (your agent sockets may be different):
Host
  Hostname remote-host.tld
  StreamLocalBindUnlink yes
  RemoteForward /run/user/1000/gnupg/S.gpg-agent /run/user/1000/gnupg/S.gpg-agent.extra
  # RemoteForward [remote socket] [local socket]
If you're still having problems, it may be necessary to edit gpg-agent.conf file on the local machines to add the following information:
pinentry-program /usr/bin/pinentry-gtk-2
extra-socket /run/user/1000/gnupg/S.gpg-agent.extra
Note The pinentry program starts on local machine, not remote. Hence when there are needs to enter the pin you need to find the prompt on the local machine.
Important Any pinentry program except pinentry-tty or pinentry-curses may be used. This is because local gpg-agent may start headlessly (By systemd without $GPG_TTY set locally telling which tty it is on), thus failed to obtain the pin. Errors on the remote may be misleading saying that there is IO Error. (Yes, internally there is actually an IO Error since it happens when writing to/reading from tty while finding no tty to use, but for end users this is not friendly.)
See Issue #85 for more information and troubleshooting.
Chained GPG Agent Forwarding
Assume you have gone through the steps above and have S.gpg-agent on the remote, and you would like to forward this agent into a third box, first you may need to configure sshd_config of third in the same way as remote, then in the ssh config of remote, add the following lines:
Host third
  Hostname third-host.tld
  StreamLocalBindUnlink yes
  RemoteForward /run/user/1000/gnupg/S.gpg-agent /run/user/1000/gnupg/S.gpg-agent
  # RemoteForward [remote socket] [local socket]
You should change the path according to gpgconf --list-dirs agent-socket on remote and third.
Note On local you have S.gpg-agent.extra whereas on remote and third, you only have S.gpg-agent.
Using Multiple Keys
To use a single identity with multiple YubiKeys - or to replace a lost card with another - issue this command to switch keys:
$ gpg-connect-agent "scd serialno" "learn --force" /bye
Alternatively, use a script to delete the GnuPG shadowed key, where the card serial number is stored (see GnuPG #T2291):
$ cat >> ~/scripts/remove-keygrips.sh <<EOF
#!/usr/bin/env bash
test ! "$@" && echo "Specify a key." && exit 1
KEYGRIPS="$(gpg --with-keygrip --list-secret-keys $@ | grep Keygrip | awk '{print $3}')"
for keygrip in $KEYGRIPS
do
    rm "$HOME/.gnupg/private-keys-v1.d/$keygrip.key" 2> /dev/null
done

gpg --card-status
EOF

$ chmod +x ~/scripts/remove-keygrips.sh

$ ~/scripts/remove-keygrips.sh $KEYID
See discussion in Issues #19 and #112 for more information and troubleshooting steps.
Require touch
Note This is not possible on YubiKey NEO.
By default, YubiKey will perform encryption, signing and authentication operations without requiring any action from the user, after the key is plugged in and first unlocked with the PIN.
To require a touch for each key operation, install YubiKey Manager and recall the Admin PIN:
Note Older versions of YubiKey Manager use touch instead of set-touch in the following commands.
Authentication:
$ ykman openpgp keys set-touch aut on
Signing:
$ ykman openpgp keys set-touch sig on
Encryption:
$ ykman openpgp keys set-touch enc on
Depending on how the YubiKey is going to be used, you may want to look at the policy options for each of these and adjust the above commands accordingly. They can be viewed with the following command:
$ ykman openpgp keys set-touch -h
Usage: ykman openpgp keys set-touch [OPTIONS] KEY POLICY

  Set touch policy for OpenPGP keys.

  KEY     Key slot to set (sig, enc, aut or att).
  POLICY  Touch policy to set (on, off, fixed, cached or cached-fixed).

  The touch policy is used to require user interaction for all operations using the private key on the YubiKey. The touch policy is set individually for each key slot. To see the current touch policy, run

      $ ykman openpgp info

  Touch policies:

  Off (default)   No touch required
  On              Touch required
  Fixed           Touch required, can't be disabled without a full reset
  Cached          Touch required, cached for 15s after use
  Cached-Fixed    Touch required, cached for 15s after use, can't be disabled
                  without a full reset

Options:
  -a, --admin-pin TEXT  Admin PIN for OpenPGP.
  -f, --force           Confirm the action without prompting.
  -h, --help            Show this message and exit.
If the YubiKey is going to be used within an email client that opens and verifies encrypted mail, Cached or Cached-Fixed may be desirable.
YubiKey will blink when it is waiting for a touch. On Linux you can also use yubikey-touch-detector to have an indicator or notification that YubiKey is waiting for a touch.
GPG keys on YubiKey can be used with ease to encrypt and/or sign emails and attachments using Thunderbird, Enigmail and Mutt. Thunderbird supports OAuth 2 authentication and can be used with Gmail. See this guide from EFF for detailed instructions. Mutt has OAuth 2 support since version 2.0.
Mailvelope on macOS
Mailvelope allows GPG keys on YubiKey to be used with Gmail and others.
Important Mailvelope does not work with the throw-keyids option set in gpg.conf.
On macOS, install gpgme using Homebrew:
$ brew install gpgme
To allow Chrome to run gpgme, edit ~/Library/Application\ Support/Google/Chrome/NativeMessagingHosts/gpgmejson.json and add:
{
    "name": "gpgmejson",
    "description": "Integration with GnuPG",
    "path": "/usr/local/bin/gpgme-json",
    "type": "stdio",
    "allowed_origins": [
        "chrome-extension://kajibbejlbohfaggdiogboambcijhkke/"
    ]
}
Edit the default path to allow Chrome to find GPG:
$ sudo launchctl config user path /usr/local/bin:/usr/bin:/bin:/usr/sbin:/sbin
Finally, install the Mailvelope extension from the Chrome app store.
Mutt
Mutt has both CLI and TUI interfaces, and the latter provides powerful functions for daily email processing. In addition, PGP can be integrated such that signing/encryption/verifying/decryption can be done without leaving TUI.
To enable GnuPG support, one can just use the config file gpg.rc provided by mutt, usually located at /usr/share/doc/mutt/samples/gpg.rc after installation. One only needs to edit the file on options like pgp_default_key, pgp_sign_as and pgp_autosign. After editting one can source this rcfile in their main muttrc to use it.
Important If one uses pinentry-tty as one's pinentry program in gpg-agent.conf, it would mess with one's Mutt TUI, as reported. This is because Mutt TUI uses curses while tty output may harm the format. It is recommended to use pinentry-curses or other graphic pinentry program.
Reset
If PIN attempts are exceeded, the card is locked and must be reset and set up again using the encrypted backup.
Copy the following script to a file and run gpg-connect-agent -r $file to lock and terminate the card. Then re-insert YubiKey to reset.
/hex
scd serialno
scd apdu 00 20 00 81 08 40 40 40 40 40 40 40 40
scd apdu 00 20 00 81 08 40 40 40 40 40 40 40 40
scd apdu 00 20 00 81 08 40 40 40 40 40 40 40 40
scd apdu 00 20 00 81 08 40 40 40 40 40 40 40 40
scd apdu 00 20 00 83 08 40 40 40 40 40 40 40 40
scd apdu 00 20 00 83 08 40 40 40 40 40 40 40 40
scd apdu 00 20 00 83 08 40 40 40 40 40 40 40 40
scd apdu 00 20 00 83 08 40 40 40 40 40 40 40 40
scd apdu 00 e6 00 00
scd apdu 00 44 00 00
/echo Card has been successfully reset.
Or use ykman (sometimes in ~/.local/bin/):
$ ykman openpgp reset
WARNING! This will delete all stored OpenPGP keys and data and restore factory settings? [y/N]: y
Resetting OpenPGP data, don't remove your YubiKey...
Success! All data has been cleared and default PINs are set.
PIN:         123456
Reset code:  NOT SET
Admin PIN:   12345678
Recovery after reset
If for whatever reason you need to reinstate your YubiKey from your master key backup (such as the one stored on an encrypted USB described in Backup), follow the following steps in Rotating keys to setup your environment, and then follow the steps of again Configure Smartcard.
Before you unmount your backup, ask yourself if you should make another one just in case.
Notes
- YubiKey has two configurations: one invoked with a short press, and the other with a long press. By default, the short-press mode is configured for HID OTP - a brief touch will emit an OTP string starting with
cccccccc. If you rarely use the OTP mode, you can swap it to the second configuration via the YubiKey Personalization tool. If you never use OTP, you can disable it entirely using the YubiKey Manager application (note, this not the similarly named older YubiKey NEO Manager). - Programming YubiKey for GPG keys still lets you use its other configurations - U2F, OTP and static password modes, for example.
- Setting an expiry essentially forces you to manage your subkeys and announces to the rest of the world that you are doing so. Setting an expiry on a primary key is ineffective for protecting the key from loss - whoever has the primary key can simply extend its expiry period. Revocation certificates are better suited for this purpose. It may be appropriate for your use case to set expiry dates on subkeys.
- To switch between two or more identities on different keys - unplug the first key and restart gpg-agent, ssh-agent and pinentry with
pkill gpg-agent ; pkill ssh-agent ; pkill pinentry ; eval $(gpg-agent --daemon --enable-ssh-support), then plug in the other key and rungpg-connect-agent updatestartuptty /bye- then it should be ready for use. - To use yubikeys on more than one computer with gpg: After the initial setup, import the public keys on the second workstation. Confirm gpg can see the card via
gpg --card-status, Trust the public keys you imported ultimately (as above). At this pointgpg --list-secret-keysshould show your (trusted) key.
Troubleshooting
-
Use
man gpgto understand GPG options and command-line flags. -
To get more information on potential errors, restart the
gpg-agentprocess with debug output to the console withpkill gpg-agent; gpg-agent --daemon --no-detach -v -v --debug-level advanced --homedir ~/.gnupg. -
If you encounter problems connecting to YubiKey with GPG - try unplugging and re-inserting YubiKey, and restarting the
gpg-agentprocess. -
If you receive the error,
gpg: decryption failed: secret key not available- you likely need to install GnuPG version 2.x. Another possibility is that there is a problem with the PIN, e.g. it is too short or blocked. -
If you receive the error,
Yubikey core error: no yubikey present- make sure the YubiKey is inserted correctly. It should blink once when plugged in. -
If you still receive the error,
Yubikey core error: no yubikey present- you likely need to install newer versions of yubikey-personalize as outlined in Required software. -
If you receive the error,
Yubikey core error: write error- YubiKey is likely locked. Install and run yubikey-personalization-gui to unlock it. -
If you receive the error,
Key does not match the card's capability- you likely need to use 2048 bit RSA key sizes. -
If you receive the error,
sign_and_send_pubkey: signing failed: agent refused operation- make sure you replacedssh-agentwithgpg-agentas noted above. -
If you still receive the error,
sign_and_send_pubkey: signing failed: agent refused operation- run the commandgpg-connect-agent updatestartuptty /bye -
If you still receive the error,
sign_and_send_pubkey: signing failed: agent refused operation- edit~/.gnupg/gpg-agent.confto set a validpinentryprogram path, e.g.pinentry-program /usr/local/bin/pinentry-macon macOS. -
If you still receive the error,
sign_and_send_pubkey: signing failed: agent refused operation- it is a known issue that openssh 8.9p1 and higher has issues with YubiKey. AddingKexAlgorithms -sntrup761x25519-sha512@openssh.comto/etc/ssh/ssh_configoften resolves the issue. -
If you receive the error,
The agent has no identitiesfromssh-add -L, make sure you have installed and startedscdaemon. -
If you receive the error,
Error connecting to agent: No such file or directoryfromssh-add -L, the UNIX file socket that the agent uses for communication with other processes may not be set up correctly. On Debian, tryexport SSH_AUTH_SOCK="/run/user/$UID/gnupg/S.gpg-agent.ssh". Also see thatgpgconf --list-dirs agent-ssh-socketis returning single path, to existingS.gpg-agent.sshsocket. -
If you receive the error,
Permission denied (publickey), increase ssh verbosity with the-vflag and ensure the public key from the card is being offered:Offering public key: RSA SHA256:abcdefg... cardno:00060123456. If it is, ensure you are connecting as the right user on the target system, rather than as the user on the local system. Otherwise, be sureIdentitiesOnlyis not enabled for this host. -
If SSH authentication still fails - add up to 3
-vflags to thesshclient to increase verbosity. -
If it still fails, it may be useful to stop the background
sshddaemon process service on the server (e.g. usingsudo systemctl stop sshd) and instead start it in the foreground with extensive debugging output, using/usr/sbin/sshd -eddd. Note that the server will not fork and will only process one connection, therefore has to be re-started after everysshtest. -
If you receive the error,
Please insert the card with serial number: *see using of multiple keys. -
If you receive the error,
There is no assurance this key belongs to the named userorencryption failed: Unusable public keyusegpg --edit-keyto settrustto5 = I trust ultimately.- If, when you try the above
--edit-keycommand, you get the errorNeed the secret key to do this., you can manually specify trust for the key in~/.gnupg/gpg.confby using thetrust-key [your key ID]directive.
- If, when you try the above
-
If, when using a previously provisioned YubiKey on a new computer with
pass, you see the following error onpass insert:gpg: 0x0000000000000000: There is no assurance this key belongs to the named user gpg: [stdin]: encryption failed: Unusable public keyyou need to adjust the trust associated with the key. See the above bullet.
-
If you receive the error,
gpg: 0x0000000000000000: skipped: Unusable public key,signing failed: Unusable secret key, orencryption failed: Unusable public keythe sub-key may be expired and can no longer be used to encrypt nor sign messages. It can still be used to decrypt and authenticate, however. -
Refer to Yubico article Troubleshooting Issues with GPG for additional guidance.
Alternatives
piv-agentis an SSH and GPG agent which you can use with your PIV hardware security device (e.g. a Yubikey).
Links
- https://alexcabal.com/creating-the-perfect-gpg-keypair/
- https://blog.habets.se/2013/02/GPG-and-SSH-with-Yubikey-NEO
- https://blog.josefsson.org/2014/06/23/offline-gnupg-master-key-and-subkeys-on-yubikey-neo-smartcard/
- https://blog.onefellow.com/post/180065697833/yubikey-forwarding-ssh-keys
- https://developers.yubico.com/PGP/
- https://developers.yubico.com/yubikey-personalization/
- https://evilmartians.com/chronicles/stick-with-security-yubikey-ssh-gnupg-macos
- https://gist.github.com/ageis/14adc308087859e199912b4c79c4aaa4
- https://github.com/herlo/ssh-gpg-smartcard-config
- https://github.com/tomlowenthal/documentation/blob/master/gpg/smartcard-keygen.md
- https://help.riseup.net/en/security/message-security/openpgp/best-practices
- https://jclement.ca/articles/2015/gpg-smartcard/
- https://rnorth.org/gpg-and-ssh-with-yubikey-for-mac
- https://trmm.net/Yubikey
- https://www.bootc.net/archives/2013/06/09/my-perfect-gnupg-ssh-agent-setup/
- https://www.esev.com/blog/post/2015-01-pgp-ssh-key-on-yubikey-neo/
- https://www.hanselman.com/blog/HowToSetupSignedGitCommitsWithAYubiKeyNEOAndGPGAndKeybaseOnWindows.aspx
- https://www.void.gr/kargig/blog/2013/12/02/creating-a-new-gpg-key-with-subkeys/
- https://mlohr.com/gpg-agent-forwarding/
- https://www.ingby.com/?p=293
- https://support.yubico.com/support/solutions/articles/15000027139-yubikey-5-2-3-enhancements-to-openpgp-3-4-support